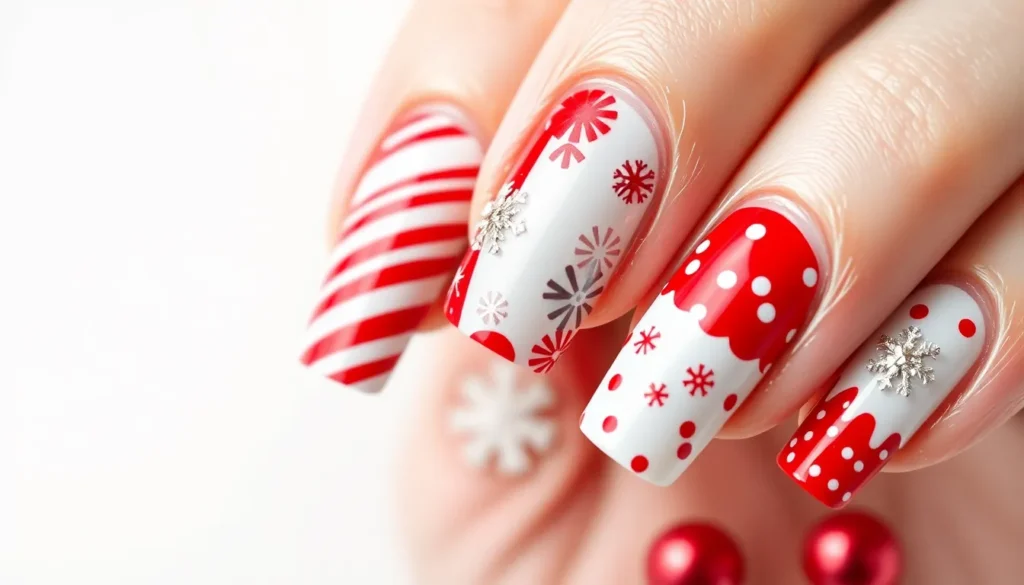
Nothing captures the magic of Christmas quite like perfectly polished nails in festive red and white. We’ve all been there – scrolling through endless holiday nail inspiration wondering which design will make our manicure stand out at every party and gathering this season.
Red and white Christmas nail designs offer the perfect blend of classic elegance and holiday cheer. Whether you’re drawn to candy cane stripes snowflake patterns or glamorous glitter accents these timeless colors create stunning combinations that complement any holiday outfit. From subtle accent nails to bold statement designs the possibilities are endless.
We’re about to share the most gorgeous red and white Christmas nail ideas that’ll have everyone asking where you got your manicure done. These designs range from beginner-friendly DIY options to intricate patterns that’ll challenge even experienced nail artists. Get ready to discover your new favorite holiday look that’ll keep your nails festive all season long.
Classic Red and White Candy Cane Striped Nails
Candy cane striped nails capture the essence of Christmas with their iconic red and white pattern. These designs bring instant holiday cheer to your fingertips while maintaining a timeless appeal that works for any festive occasion.
Traditional Diagonal Stripes
Diagonal candy cane stripes create the most authentic candy cane look on your nails. Start with a white base coat and let it dry completely before applying thin red diagonal lines using a striping brush or nail tape. Position the stripes at a 45-degree angle for the most visually appealing effect.
We recommend spacing the red stripes evenly across each nail, leaving approximately 2-3mm between each line. This spacing mimics real candy canes perfectly and prevents the design from looking cluttered. Apply a clear top coat to seal the design and add shine that makes the stripes pop.
Vertical Candy Cane Lines
Vertical candy cane stripes offer a modern twist on the traditional diagonal approach. Paint alternating vertical red and white stripes from cuticle to tip for a bold, graphic look. Each stripe should be roughly 2mm wide to maintain proper proportions on most nail shapes.
This vertical variation works exceptionally well on longer nails where you have more surface area to showcase the pattern. Use a fine detail brush to ensure clean, straight lines, and consider using nail guides or tape for perfectly uniform stripes. The vertical design also helps elongate shorter nails visually.
French Tip Candy Cane Variation
French tip candy cane nails combine classic French manicure elegance with festive holiday spirit. Create a traditional white French tip base, then add thin red diagonal stripes only across the white tip area. This subtle approach to candy cane nails works perfectly for professional settings during the holidays.
Focus the red stripes on just the tip portion, keeping 3-4 thin diagonal lines for the best visual impact. This design maintains sophistication while adding just enough holiday flair to complement both casual and formal holiday outfits. The contrast between the natural nail bed and striped tips creates an eye-catching yet refined look.


Elegant Red and White Snowflake Patterns

Snowflake designs elevate red and white Christmas nails to sophisticated winter art. We’ll explore three distinct techniques that create stunning snowflake patterns on your festive manicure.
Hand-Painted Snowflake Details
Hand painted snowflakes offer the most personalized approach to creating unique winter nail art. We recommend using a fine nail art brush with white polish to paint intricate snowflake patterns onto your red base. Steady hands and patience are essential for this technique, but the customized results make the effort worthwhile.
Creating these delicate patterns requires starting with a solid red base coat. We suggest waiting for complete drying before beginning your snowflake work. Each snowflake can vary in size and complexity, allowing you to create one of a kind designs that reflect your personal style.
Stamped Snowflake Designs
Stamped snowflakes provide a quick and beginner friendly method for achieving professional looking results. We use stamping plates with snowflake patterns pressed onto red nails using white stamping polish. This technique ensures uniform and detailed snowflakes on each nail with crisp, clean lines.
Beginners find stamping particularly appealing because it eliminates the need for steady brush work. We recommend investing in quality stamping plates and polish for the best results. Each nail receives identical snowflake patterns, creating a cohesive and polished appearance across your entire manicure.
3D Snowflake Embellishments
3D snowflakes add remarkable texture and dimension to red and white Christmas nail designs. We incorporate small rhinestones, glitter, or molded acrylic pieces arranged into snowflake shapes atop red nails. These embellishments make designs stand out dramatically, especially for special holiday occasions.
Securing these elements requires nail glue and a clear top coat for optimal durability. We position each embellishment carefully to create balanced snowflake formations. The three dimensional effect catches light beautifully, creating sparkle and depth that traditional painted designs cannot achieve.


Festive Red and White Polka Dot Christmas Nails

Polka dot patterns bring playful charm to red and white Christmas nail designs. These timeless patterns offer endless possibilities for creating festive manicures that capture the holiday spirit.
Large Statement Dots
Bold white dots on vibrant red backgrounds create the most eye-catching polka dot Christmas nails. We recommend using a dotting tool or the eraser end of a pencil to create perfectly round shapes. Large dots work best when spaced evenly across each nail, leaving enough red space between them to maintain visual balance.
Professional nail artists suggest using high-quality white polish for opacity and coverage. The contrast between bold red and crisp white makes these statement dots pop beautifully under holiday lights. We find that applying dots while the base coat is slightly tacky helps them adhere better and prevents smudging.
These statement dots pair perfectly with solid red accent nails for a cohesive look. Consider alternating between dotted nails and solid red nails across your manicure to create visual interest without overwhelming the design.
Mixed Size Polka Dot Patterns
Combining various dot sizes adds incredible depth and dimension to Christmas nail art. We create these patterns by starting with larger dots as focal points, then filling in spaces with medium and small dots. This layered approach mimics the natural randomness of falling snow while maintaining the festive red and white theme.
Different sized dotting tools make this technique achievable for beginners and experts alike. Start with your largest dots first, positioning them strategically across the nail. Follow with medium dots in the remaining spaces, then finish with tiny dots to fill any gaps and create a full, rich pattern.
Visual interest increases dramatically when dots overlap slightly at their edges. This creates a more organic, flowing design that feels less rigid than perfectly spaced patterns. We recommend varying the pressure on your dotting tool to create slightly different opacity levels within each size category.
Gradient Polka Dot Effects
Gradually changing dot sizes from cuticle to tip creates stunning gradient effects in polka dot designs. We start with the largest dots near the cuticle area and progressively decrease the size toward the nail tip. This technique elongates the appearance of shorter nails while adding sophisticated movement to the design.
Reverse gradients work equally well, beginning with tiny dots and growing larger toward the tip. The direction you choose depends on your nail shape and personal preference. Oval and almond shaped nails showcase ascending gradients beautifully, while square nails often look best with descending patterns.
Color gradients combined with size gradients create the most ever-changing polka dot Christmas nails. We achieve this by starting with deep red dots that gradually lighten to pink, then finish with pure white dots. This creates incredible depth while maintaining the classic Christmas color scheme that makes these designs so appealing for holiday celebrations.


Sophisticated Red and White Plaid Christmas Designs

We’re elevating holiday nail art with sophisticated plaid patterns that bring timeless elegance to your festive manicure. These classic designs offer a refined alternative to traditional Christmas motifs while maintaining that cozy winter charm.
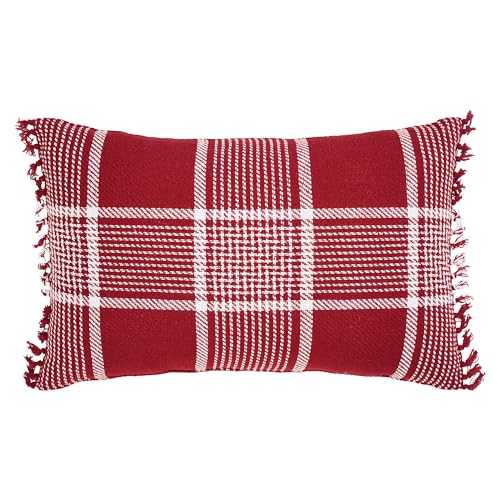
Buffalo Check Pattern
Buffalo check creates bold visual impact with its large alternating blocks of red and white. We recommend starting with a white base coat and using nail tape to section off square patterns before applying deep red polish. This classic winter pattern delivers striking contrast that captures attention while maintaining sophisticated appeal. Creating even squares requires careful measurement, so we suggest using a small ruler or grid template for precise spacing. The buffalo check design works exceptionally well on longer nails where the pattern has space to shine, though shorter nails can showcase mini versions with equally stunning results.
Tartan Plaid Accents
Tartan inspired designs incorporate intersecting lines that create depth and visual interest through layered patterns. We start with a white or nude base and add thin red lines both horizontally and vertically, allowing each layer to dry completely before adding the next. These sophisticated accents work beautifully as statement nails on just one or two fingers, creating balanced elegance without overwhelming your overall look. Adding subtle black lines between the red creates authentic tartan styling that evokes refined holiday traditions. The intersecting pattern technique requires steady hands, so we recommend using striping tape for clean, professional looking lines.
Minimalist Plaid Lines
Minimalist approaches use thin crisscross patterns that provide festive spirit without bold dramatic impact. We create these designs by applying delicate red and white lines over a clear or nude base coat using a fine detail brush or nail art pen. This understated style works perfectly for professional environments where subtle holiday touches are preferred over bold statements. The key lies in maintaining consistent line thickness and spacing to achieve that clean, sophisticated appearance. We find this technique particularly effective for those new to plaid nail art since it requires fewer complex steps while still delivering beautiful results.


Glamorous Red and White Glitter Christmas Nails

Transform your festive manicure with sparkling glitter techniques that elevate traditional red and white Christmas nail designs. These sophisticated glitter applications create stunning holiday looks perfect for any celebration.
Full Glitter Coverage
Bold, vibrant nails emerge when we apply complete glitter coverage using gel or acrylic polish as our foundation. Start with a solid red or white base coat and follow with matching color glitter polish while the base remains slightly tacky. Press loose glitter onto wet polish using a flat brush for even distribution across the entire nail surface.
Clean edges become essential for professional results, so we use a fine tip brush to remove excess glitter around the cuticle area. Seal everything with a glossy top coat to create a highly reflective, uniform finish that’s perfect for holiday events and parties. This technique works beautifully on any nail length and creates maximum sparkle impact.
Glitter Gradient Techniques
Stunning ombre effects develop when we apply glitter in graduated densities from tip to base. Begin with your chosen red base color and immediately work with the polish while it’s still wet. Apply glitter polish or loose glitter heavily at the nail tip, then gradually decrease the density as you move toward the cuticle area.
Blend the transition zones using a soft brush or makeup sponge to create smooth gradients that draw attention to your fingertips. This subtle yet eye catching technique produces sophisticated results that complement both casual and formal holiday outfits. Finish with a glossy top coat to enhance the sparkle and ensure your gradient effect lasts throughout the season.
Strategic Glitter Placement
Focused glitter application creates stunning accent designs when we target exact nail areas rather than covering entire surfaces. French tip styles work beautifully with white glitter concentrated only at the nail tips, while accent nails featuring full glitter coverage on just one or two fingers create balanced, elegant looks.
Design intricate patterns like snowflakes or stars by using stencils or tape to guide precise glitter placement in decorative shapes. Rhinestones, metallic studs, and 3D glitter flakes add dimensional elements that catch light from multiple angles. Consider candy cane stripe patterns with glitter highlights or delicate star formations using strategic sparkle placement for maximum festive impact.


Charming Red and White Santa Hat Nail Art

Santa hat nail art brings the magic of Christmas directly to your fingertips with its instantly recognizable festive design. This beloved holiday motif transforms your nails into miniature Santa hats that capture the joyful spirit of the season.
Classic Santa Hat Shape
Creating the perfect Santa hat silhouette starts with establishing the right proportions on your nail canvas. We recommend beginning with a white base coat to ensure your red polish appears vibrant and opaque. The classic Santa hat design features a triangular red shape that covers approximately two-thirds of your nail, leaving space for the white brim at the base.
Position your red triangle so it naturally follows your nail’s curve, creating an authentic hat appearance. Start painting from one corner of your cuticle line and angle upward toward the opposite corner, then complete the triangle by connecting to the center top of your nail. This technique ensures your Santa hat maintains its classic proportions while complementing your nail shape.
Textured Santa Hat Details
Adding texture to your Santa hat design elevates the overall appearance and creates visual interest that mimics real fabric. We achieve this dimensional effect by layering different nail art techniques that enhance the hat’s authentic appearance. The white band at the base of each hat benefits from slightly thicker application, creating a raised effect that resembles the fluffy trim found on actual Santa hats.
Consider using a matte top coat on the red portion of your Santa hat while keeping the white sections glossy for contrast. This technique creates depth and makes the design appear more realistic. Small white dots or short brushstrokes along the hat’s edge can simulate the fuzzy texture of Santa’s traditional headwear.
Mini Santa Hat Accents
Mini Santa hat accents work beautifully as complementary designs when you want variety across your manicure. We suggest featuring full Santa hats on your ring fingers while adding tiny hat accents to your remaining nails for a cohesive look. These smaller versions can be painted as simple red triangles with white dots at the tips, representing the hat’s pompom.
Create mini Santa hats using a fine nail art brush to paint small triangular shapes on accent nails. Position these tiny hats at different angles across your nails to create movement and visual interest. The miniature versions work particularly well on shorter nails where full-sized Santa hats might overwhelm the nail bed, ensuring every finger contributes to your festive holiday manicure.


Creative Red and White Christmas Tree Designs

Christmas tree nail art brings the magic of the holidays directly to your fingertips. We’ll explore three stunning techniques that transform simple red and white polish into festive evergreen masterpieces.
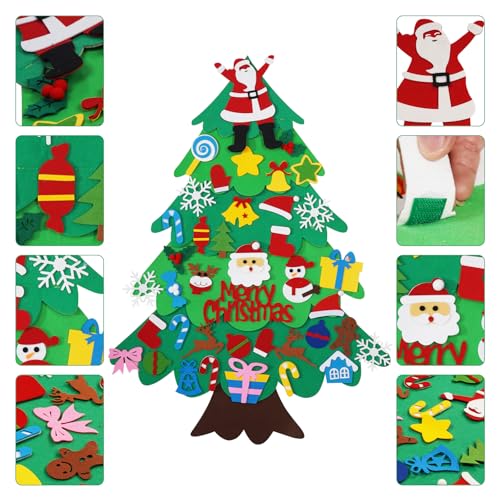
Simple Triangle Trees
Triangle tree designs offer the perfect starting point for Christmas nail art beginners. We recommend using green polish as your base and creating triangular shapes that mimic classic Christmas tree silhouettes. Starting with a white base coat ensures your colors pop with maximum vibrancy.
Red and white accents transform basic triangles into festive focal points. Add tiny red dots using a dotting tool to represent ornaments, spacing them evenly across each triangle. White highlights create the illusion of twinkling lights when applied with a fine brush along the tree edges.
Positioning strategies make or break your triangle tree design. Place larger triangles on your ring finger as statement pieces while keeping smaller versions on remaining nails for balance. The key lies in maintaining consistent proportions across all nails for a cohesive holiday look.
Detailed Evergreen Patterns
Evergreen branch techniques require more precision but deliver stunning realistic results. We start by painting thin diagonal lines in dark green, then layer lighter green strokes to create depth and dimension. Each branch should vary slightly in length to mimic natural evergreen growth patterns.
Berry and light details elevate evergreen patterns from simple to spectacular. Small red dots represent holly berries when clustered at branch intersections, while tiny white dots simulate fresh snow or twinkling lights. Using a fine liner brush ensures each detail remains crisp and professional looking.
Layering methods create the most authentic evergreen appearance. Apply your darkest green first as the base layer, then add medium green branches, finishing with light green highlights. This three layer approach gives your evergreen patterns realistic depth that catches light beautifully.
Abstract Tree Silhouettes
Bold geometric trees make striking statement nails using angular shapes and clean lines. We create these by painting sharp triangular forms in solid red or white, leaving the background color to define the tree’s negative space. Geometric precision matters more than realistic proportions in these modern interpretations.
Gradient silhouette effects blend red and white colors within single tree shapes for contemporary appeal. Start with white at the tree base and gradually transition to deep red at the top using a makeup sponge for smooth color blending. This technique creates stunning sunset inspired Christmas trees.
Minimalist tree outlines work perfectly for professional holiday looks. Simple line work using thin brushes creates elegant tree shapes without overwhelming detail. We suggest alternating filled and outlined trees across your nails, using red outlines on white backgrounds and white outlines on red bases for maximum contrast.

![[GLORS] Christmas Press-On Nails, Short Square Handmade 3D Festive Design,](https://m.media-amazon.com/images/I/41YnMWjYI8L._SL500_.jpg)

Playful Red and White Reindeer Christmas Nails

Nothing captures the whimsical spirit of Christmas quite like adorable reindeer nail art that brings beloved holiday characters to life on your fingertips.
Reindeer Face Designs
Creating charming reindeer faces transforms your nails into miniature winter wonderlands. Start with a white base coat and use a small brush to paint a red oval for Rudolph’s famous nose. Add two white dots for eyes and use black polish to create pupils and small curved lines for a smiling mouth. Brown polish works perfectly for drawing simple antler shapes above the face, while tiny white dots can represent snow falling around your reindeer friend. We recommend using a fine detail brush for the facial features to ensure clean lines and proportionate details.
Reindeer Silhouette Art
Silhouette designs offer a sophisticated approach to reindeer nail art that’s surprisingly easy to achieve. Paint your base coat in deep red and let it dry completely before adding white reindeer silhouettes using a small brush or nail art pen. Focus on creating the distinctive antler shape and elegant body profile that makes reindeer instantly recognizable. Alternatively, use white as your base and add red reindeer silhouettes for a striking contrast. This technique works beautifully on accent nails when paired with solid red or white polish on remaining fingers.
Rudolph Inspired Accent Nails
Rudolph themed accent nails celebrate the most famous reindeer with eye catching details that steal the show. Choose one or two nails per hand to feature Rudolph’s signature red nose prominently against a white background. Add simple brown antlers extending from the base of the nail and use black polish for small dots representing eyes. Glitter polish in red or white can enhance the magical effect when applied sparingly around the design. We suggest keeping other nails in solid red or white to maintain balance while letting your Rudolph accent nails shine as the focal point of your festive manicure.


Modern Red and White Geometric Christmas Patterns

Geometric nail art transforms traditional Christmas colors into contemporary masterpieces that blend festive charm with modern sophistication. Bold patterns featuring clean lines and structured shapes create striking visual appeal while maintaining that essential holiday magic we all crave.
Triangle Christmas Trees
Triangle designs offer the perfect foundation for creating stylish Christmas tree nail art. We recommend starting with a crisp white base coat before carefully painting triangular shapes in deep red polish. Each triangle should be positioned strategically on the nail to simulate a miniature forest of festive trees.
Layering techniques elevate these simple shapes into sophisticated designs. Outline each red triangle with thin white lines to create dimensional depth, or reverse the color scheme for variety across your manicure. Gold or silver rhinestones work beautifully as tree toppers, adding a luxurious finish that catches light with every gesture.
Size variation creates visual interest throughout your geometric Christmas tree design. Paint larger triangles on accent nails while keeping smaller versions on remaining fingers for balanced proportions. This approach ensures your manicure feels cohesive without appearing repetitive or overwhelming.
Diamond Pattern Designs
Diamond shapes create captivating harlequin effects that perfectly capture holiday elegance. Alternating red and white diamonds across each nail produces a checkerboard pattern that’s both playful and sophisticated. We suggest using nail tape to achieve perfectly straight edges and consistent diamond proportions.
Color blocking techniques maximize the impact of diamond patterns in your Christmas manicure. Fill each diamond completely with solid color rather than just outlining the shapes for bold visual contrast. This method creates more dramatic results that photograph beautifully under holiday lighting.
Interspersed accent elements enhance diamond pattern designs beyond basic geometric shapes. Add thin candy cane stripes between diamond rows or place small dot details at intersection points. These subtle additions create complexity while maintaining the clean geometric aesthetic that makes these patterns so appealing.
Abstract Holiday Shapes
Abstract interpretations of traditional Christmas motifs offer creative freedom within geometric frameworks. Free form snowflakes painted with angular lines instead of curved details maintain the geometric theme while celebrating winter magic. We love combining sharp angles with organic flow for unexpected visual interest.
Stylized ribbon shapes bring gift wrapping inspiration directly to your fingertips. Create angular bow designs using intersecting triangular forms in alternating red and white sections. These abstract ribbons work especially well as accent nail features paired with simpler geometric patterns on remaining fingers.
Irregular pattern combinations push geometric Christmas nail art into truly artistic territory. Mix triangular trees with diamond accents and abstract snowflake details for a cohesive yet varied design approach. Glitter dots strategically placed at pattern intersections add sparkle without overwhelming the clean geometric lines that define this modern nail art style.


Timeless Red and White Holly Berry Nail Art

Holly berry nail art brings traditional Christmas charm to your festive manicure with its classic red and white color scheme. We’ll show you how to create stunning holly designs that capture the essence of the season.
Traditional Holly Leaves
Reimagining the traditional holly leaf design, we create striking foliage using deep red polish instead of the expected green. Paint the iconic holly leaf shape with its characteristic pointed edges and wavy outline using a fine nail art brush. White detailing adds dimension and visual interest when applied with a dotting tool along the leaf veins and edges. This unexpected color twist maintains the festive spirit while perfectly complementing your red and white Christmas theme.
Berry Cluster Details
Creating authentic berry clusters starts with painting small red circles using a dotting tool for consistent size and placement. We recommend grouping berries in clusters of three to five for the most natural appearance. White dots placed in the center of each berry add realistic highlights and depth to your design. Multiple berry clusters scattered across your nails create an organic holly branch effect that feels both elegant and playful.
Holly Border Designs
Border techniques transform simple nail art into sophisticated holiday statements using holly inspired patterns. We suggest creating alternating red and white stripes along your nail edges to mimic the natural clustering of holly berries and leaves. Dotted borders offer another approach, featuring small red berries separated by white accents that frame your entire nail. These border designs work beautifully as accent elements or can be combined with solid colored nails to create a cohesive holly berry themed manicure.


Conclusion
Red and white Christmas nail designs offer endless possibilities for creating stunning holiday manicures that perfectly capture the festive spirit. From classic candy cane stripes to elegant snowflakes and modern geometric patterns we’ve explored designs that suit every skill level and style preference.
These timeless color combinations work beautifully for any holiday occasion whether you’re attending a formal party or enjoying a cozy family gathering. The versatility of red and white allows you to mix and match techniques creating unique looks that reflect your personal style.
We encourage you to experiment with different textures finishes and embellishments to make these designs your own. Remember that practice makes perfect and even simple techniques can create absolutely gorgeous results that’ll have everyone admiring your festive fingertips this Christmas season.
Frequently Asked Questions
What makes red and white Christmas nail designs so popular?
Red and white Christmas nail designs are beloved for their classic elegance and festive spirit. These colors perfectly capture the holiday season while offering timeless sophistication. The combination works beautifully with any holiday outfit and provides endless design possibilities, from simple candy cane stripes to intricate snowflake patterns, making them suitable for both beginners and experienced nail artists.
How do I create perfect candy cane stripes on my nails?
To create candy cane stripes, start with a white base coat and let it dry completely. Use nail tape or a thin brush to create diagonal stripes with red polish, spacing them evenly across the nail. For vertical stripes, apply them straight down the nail for a bold graphic look. Keep lines consistent in width for the most polished appearance.
What’s the easiest way to make snowflake designs on nails?
For beginners, stamped snowflakes are the easiest option – simply use nail stamping plates with snowflake patterns for uniform results. For hand-painted designs, use a fine brush with white polish to create delicate snowflake patterns over a red base. You can also add 3D elements like small rhinestones or glitter for extra dimension and sparkle.
How can I achieve professional-looking polka dot Christmas nails?
Use a dotting tool for even spacing and consistent dot sizes. Start with either a red or white base coat, then create dots with the contrasting color. For mixed-size patterns, use different sized dotting tools or the round end of bobby pins. Allow each layer to dry completely before adding additional dots or details for the cleanest finish.
What tools do I need for red and white plaid nail designs?
Essential tools include nail tape or striping tape for clean lines, a thin nail art brush, and both red and white polish. For buffalo check patterns, use nail tape to create square sections. For tartan plaid, you’ll need steady hands to create intersecting lines. A top coat is crucial for sealing the design and ensuring longevity.
How do I apply glitter to Christmas nails without making them look messy?
For full glitter coverage, apply a solid base coat first, then add glitter polish in thin layers. Use a makeup sponge for gradient effects, dabbing from the nail tip toward the cuticle. Clean up edges with a small brush dipped in acetone. Always finish with a top coat to smooth the surface and prevent glitter from chipping.
Are these Christmas nail designs suitable for short nails?
Absolutely! Most red and white Christmas designs work beautifully on short nails. Opt for smaller patterns like mini polka dots, thin stripes, or simple geometric shapes. Santa hat designs and holly berry patterns can be scaled down to fit shorter nail beds. The key is adjusting the size of your design elements to match your nail length.
How long do these festive nail designs typically last?
With proper application and a quality top coat, these designs can last 7-10 days. Key factors for longevity include proper nail prep, allowing each layer to dry completely, and applying a protective top coat. Avoid harsh chemicals and wear gloves when cleaning to extend the life of your festive manicure.
Can beginners successfully create these Christmas nail art designs?
Yes! Many designs like simple stripes, basic polka dots, and triangle Christmas trees are perfect for beginners. Start with easier techniques and gradually work up to more complex patterns. Using tools like dotting implements, nail tape, and stamping plates can help achieve professional-looking results even with limited experience.
What’s the best base coat to use for red and white Christmas nails?
A white base coat works best for most designs as it makes colors appear more vibrant and true to tone. For designs starting with red bases, ensure you use a high-quality red polish that applies evenly. Always use a clear base coat underneath to protect your natural nails and improve polish adhesion.