When it comes to ringing in the new year, we want every detail to sparkle—including our nails. There’s something magical about watching the countdown with perfectly polished fingertips that catch the light and reflect our excitement for what’s ahead.
We’ve all felt that rush of confidence when our nails look absolutely stunning, and New Year’s Eve deserves nothing less than show-stopping nail art. Whether you’re planning an intimate gathering or a glamorous night out, the right nail design can elevate your entire look and make you feel like the star of your own celebration.
From glittery gradients that mirror fireworks to elegant metallic accents that complement your party dress, we’re about to explore nail designs that’ll make your hands the center of attention. These aren’t just manicures—they’re statements of style that capture the joy and anticipation of new beginnings.
Classic Gold and Silver Glitter Nail Designs for New Years Sparkle
Nothing captures the essence of New Year’s celebration quite like the timeless elegance of gold and silver glitter nail designs. These metallic masterpieces serve as the perfect foundation for creating sophisticated looks that shimmer with festive energy.
Traditional Gold Accent Nails
Gold accent nails offer the most versatile approach to incorporating metallic glamour into your New Year’s manicure. We recommend applying a clear or nude base coat on four nails, then creating stunning focal points with full gold glitter coverage on your ring fingers.
Chunky gold glitter creates dramatic texture that catches light from every angle. Apply two thin coats over your chosen accent nails, allowing each layer to dry completely before adding the next for maximum sparkle intensity.
Fine gold dust provides a more subtle shimmer that works beautifully for professional settings. Mix this delicate glitter with clear topcoat and brush it over your accent nails for an understated yet festive finish.
Gold leaf application transforms ordinary nails into luxurious statements. Press small pieces of gold leaf onto tacky base coats, then seal with glossy topcoat for a mirror like finish that screams celebration.
Silver Foil Statement Designs
Silver foil designs bring futuristic elegance to your New Year’s nail art collection. We love how these reflective elements create mirror effects that amplify any lighting in party settings.
Crumpled foil technique involves pressing irregular pieces of silver foil onto wet base coats. This method creates unique patterns that ensure no two nails look exactly alike, giving you a custom designer appearance.
Geometric foil strips offer clean, modern aesthetics perfect for contemporary celebrations. Cut thin strips of foil and arrange them in triangles, diamonds, or straight lines across your nail beds for architectural beauty.
Chrome powder application delivers the most intense silver mirror finish available. Rub this specialized powder over tacky gel base coats using silicone tools for professional salon quality results at home.
Mixed Metallic Gradient Effects
Mixed metallic gradients combine the warmth of gold with the coolness of silver for balanced New Year’s sophistication. These blended designs create seamless transitions that catch light dynamically throughout your celebrations.
Sponge blending technique allows you to merge gold and silver polishes effortlessly. Dab both colors onto makeup sponges, then press them onto your nails while the polish remains wet for smooth color transitions.
Horizontal gradient placement works best when you position gold at the nail tips and silver at the cuticle areas. This orientation creates the illusion of longer nail beds while maintaining elegant proportions.
Vertical metallic stripes alternate between gold and silver sections down each nail. Apply thin strips of each color using fine brushes, creating candy cane effects that sparkle with every hand movement during toasts and celebrations.


Bold Sequin and Rhinestone Nail Art for Maximum Sparkle

Building on the stunning metallic foundations we’ve explored, adding sequins and rhinestones creates the ultimate glamorous statement for your New Year’s manicure. These dimensional elements catch light from every angle, delivering the maximum sparkle that special occasions demand.
Scattered Sequin Party Nails
Scattered sequins create a festive confetti effect that’s perfect for New Year’s celebrations. We recommend starting with a clear base coat, then applying your chosen color before randomly placing sequins across each nail using a clear top coat. This technique allows the sequins to settle naturally while creating an organic, party ready look.
Mix different sized sequins for added visual interest and depth. Small round sequins work beautifully when combined with larger hexagonal ones, creating texture variations that catch light differently. We suggest using a contrasting base color to make the sequins pop even more dramatically.
Apply a generous layer of top coat to seal everything in place. This prevents sequins from catching on fabric or falling off during your celebration. For extra shine, consider mixing sequins with glitter polish to create layers of sparkle that build upon each other.
Rhinestone Crown Designs
Rhinestone crown patterns transform your nails into regal works of art worthy of midnight celebrations. We start by placing the largest rhinestone at the center of each nail, then work outward in a crown formation using progressively smaller stones. This creates a natural focal point that draws the eye upward.
Use nail glue specifically designed for rhinestones to ensure secure placement. Apply tiny dots of glue where each stone will sit, then use tweezers to position them precisely. The key is working quickly before the glue sets while maintaining steady hands for perfect alignment.
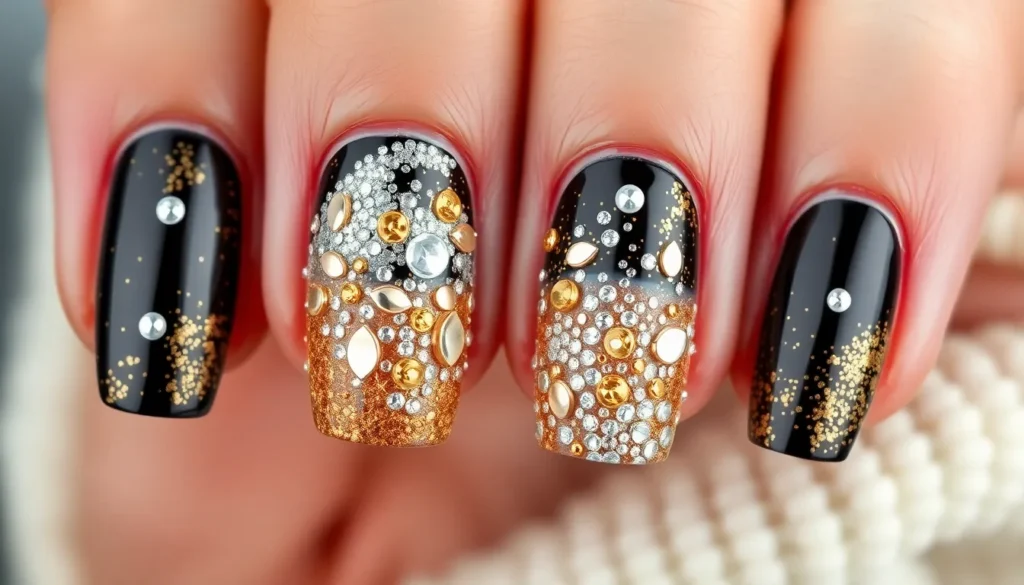
Combine different sized rhinestones for authentic crown dimension. Large stones form the crown’s peaks while smaller ones fill the valleys between. We recommend using a metallic or bold base color like deep burgundy or midnight blue to provide contrast that makes the rhinestones appear even more brilliant.
3D Embellishment Techniques
3D embellishments elevate your nail art beyond flat surfaces into sculptural masterpieces. We apply gel polish in strategic areas to create raised foundations, then secure rhinestones or sequins directly onto these dimensional bases. This technique creates layers that add visual depth and tactile interest.
Cure each layer under UV or LED light to ensure proper adhesion. The gel polish acts as both an adhesive and a platform, allowing embellishments to sit at different heights across your nail. We recommend building up the gel slowly in thin layers rather than applying one thick coat.
Seal everything with a clear top coat that flows around the raised elements. This protects the embellishments while creating a smooth finish that won’t snag. Apply the top coat carefully around each rhinestone using a thin brush to ensure complete coverage without creating air bubbles.


Midnight Black and Gold Nail Designs for New Years Sparkle

Midnight black and gold nail designs create the perfect balance between elegance and celebration for New Year’s festivities. These sophisticated color combinations offer a dramatic backdrop that makes gold accents truly shine.
Black Base with Gold Glitter Tips
Creating stunning black base nails with gold glitter tips delivers maximum impact with minimal effort. We recommend starting with two coats of jet black polish, allowing each coat to dry completely before proceeding. Apply gold glitter polish to the tips using gentle dabbing motions rather than traditional brush strokes to achieve even coverage.
Fine gold glitter creates a subtle sparkle that catches light beautifully, while chunky gold pieces deliver bold texture and drama. Position the glitter line about one third down from the nail tip for the most flattering proportions. Seal your design with a high quality top coat to prevent glitter from shedding and ensure long lasting wear.
Geometric Gold Patterns on Black
Geometric gold patterns transform simple black nails into architectural masterpieces perfect for New Year’s celebrations. We suggest using striping tape to create clean lines and precise shapes like chevrons, triangles, and zigzag patterns. Apply your black base coat first, then position the tape to form your desired geometric design.
Paint over the taped areas with gold polish, then carefully remove the tape while the gold is still slightly wet for the sharpest edges. Chevron patterns work exceptionally well on longer nails, while simple diagonal lines complement shorter nail shapes. Consider alternating patterns across different nails to create visual interest without overwhelming the overall look.
Ombre Black to Gold Transitions
Ombre black to gold transitions create breathtaking gradient effects that capture the magic of midnight celebrations. We achieve this look using a makeup sponge to blend the colors seamlessly from cuticle to tip. Start by applying your black base coat, then dab gold polish onto one corner of a damp cosmetic sponge.
Press the sponge onto the nail tip and blend upward in gentle patting motions, creating a smooth transition from black to gold. Build the gradient gradually with multiple light layers rather than trying to achieve full coverage in one application. Finish with a glossy top coat to smooth any texture created by the sponging technique and intensify the metallic shine.


Champagne and Rose Gold Elegant Nail Designs

We’re elevating our New Year’s celebration nails with the sophisticated allure of champagne and rose gold tones that perfectly capture luxury and elegance.
Champagne Bubble Effect Nails
Creating champagne bubble effect nails mimics the effervescent celebration of popping bottles at midnight. We achieve this stunning texture using specialized nail art tools or gel polish techniques that form raised, bubble-like patterns across the nail surface. Applying a combination of clear and metallic gel polish enhances the realistic champagne bubble appearance we’re aiming for.
Starting with a champagne-colored base, we use a dotting tool dipped in clear gel to create various sized bubbles randomly across each nail. Layering different opacity levels gives depth to our bubble design, making some appear closer to the surface while others seem embedded deeper. We cure each layer under UV or LED light to maintain the raised texture that makes this design so captivating.
Rose Gold Leaf Applications
Rose gold leaf applications add an instant touch of elegance that transforms ordinary nails into sophisticated masterpieces perfect for special occasions. We can apply these delicate metallic sheets in intricate patterns or use them as stunning accents to complement other nail art elements. Combining rose gold leaf with a nude base creates a subtle yet refined look that’s absolutely breathtaking.
Pressing the leaf gently onto tacky gel polish ensures proper adhesion without tearing the delicate material. We create geometric patterns by cutting the leaf into exact shapes before application, or we can crumple it for a more organic, textured appearance. Sealing our rose gold leaf design with a quality top coat protects the metallic elements while maintaining their lustrous shine throughout our celebrations.
Nude Base with Metallic Accents
Nude base nails with metallic accents offer the perfect balance between understated elegance and festive sparkle for our New Year’s look. We feature champagne or rose gold accents in the form of stripes, dots, or geometric patterns that complement the natural nail tone beautifully. Using a dotting tool or nail art brush allows us to apply these metallic accents with precision and control.
Creating thin metallic stripes along the nail’s length elongates our fingers while adding just the right amount of glamour. We can also design small geometric shapes like triangles or diamonds using metallic polish for a modern, sophisticated appearance. Alternating between different accent patterns on each nail creates visual interest while maintaining the cohesive champagne and rose gold color scheme that defines our elegant New Year’s manicure.


Firework-Inspired Nail Art for New Years Celebrations

Nothing captures the explosive energy of New Year’s celebrations quite like firework-inspired nail art. These dazzling designs mirror the brilliant displays that light up midnight skies with their radiating patterns and bursts of color.
Burst Pattern Glitter Designs
Create dramatic starburst patterns using tape or stencils to achieve professional-looking firework effects on your nails. We place thin strips of tape in a starburst formation across each nail, ensuring the lines radiate from a central point. Apply your chosen glitter polish generously over the entire nail surface, then remove the tape immediately while the polish is still wet to reveal crisp, clean lines.
Black glitter creates the most striking contrast for these burst patterns, mimicking the dark night sky punctuated by brilliant explosions. Silver holographic glitters add dimension and catch light from multiple angles, creating an eye-catching effect that’s perfect for party lighting. These bold designs work exceptionally well on accent nails or as a full manicure for maximum celebratory impact.
Chunky glitters enhance the texture and visual drama of burst patterns, while fine glitters provide a more subtle shimmer effect. We recommend applying a clear base coat first to protect your natural nails and ensure better adhesion of the glitter elements.
Colorful Explosion Nail Art
Water marbling techniques create stunning colorful explosion effects that capture the unpredictable beauty of fireworks. We drop different colored nail polishes into a bowl of room temperature water, then use a toothpick to create swirl patterns before dipping the nail into the design. This method produces unique, unrepeatable patterns that mirror the organic spread of firework bursts.
Sponge gradient applications offer another approach to achieving colorful explosion effects on your nails. Apply multiple bright colors like gold, silver, blue, and purple to a makeup sponge, then dab it onto the nail to create a blended, explosive color transition. This technique works particularly well when you want to control the placement and intensity of the color explosion.
Wet polish sprinkling adds an extra dimension to colorful explosion designs. We sprinkle fine glitter into wet polish while the colors are still blending, creating depth and sparkle that enhances the celebratory firework effect. Multiple bright hues combined in a single design create the energetic, festive look that’s ideal for New Year’s Eve celebrations.
Starry Night Sky Effects
Dark blue or black base colors provide the perfect canvas for creating elegant starry night sky nail art that complements firework themes. We apply the dark base evenly, then add scattered silver, gold, or multicolored glitter while the polish is still slightly tacky to ensure proper adhesion. This creates the illusion of stars twinkling against the night sky.
Tiny white dots and rhinestones serve as individual stars that add focal points to your starry night design. Use a dotting tool or the tip of a bobby pin to create various sized dots across the dark base, mimicking the random placement of stars in the actual night sky. Strategic placement of small rhinestones creates brighter “stars” that catch and reflect light beautifully.
Gradient shimmer effects enhance the depth and realism of starry night sky designs without overwhelming the overall look. We apply a subtle shimmer polish in thin layers over the dark base, concentrating more shimmer toward the tips or center of the nail to create dimensional effects. This subtle yet festive approach works perfectly for elegant New Year’s manicures that need to transition from day to night celebrations.


Minimalist Sparkle Nail Designs for Subtle Elegance

While bold firework displays and dramatic metallics create stunning New Year’s nails, minimalist sparkle designs offer refined elegance for those who prefer understated sophistication. We’ve crafted these subtle approaches to incorporate festive shimmer without overwhelming your overall look.
Single Accent Nail Approaches
Single accent nails create visual interest while maintaining an elegant, restrained aesthetic perfect for New Year’s celebrations. We recommend painting one nail per hand in a contrasting finish such as glitter, chrome, or foil while keeping the remaining nails in a solid, understated shade. This technique allows you to incorporate celebratory sparkle without committing to a full set of dramatic nails.
Choose a neutral base like soft gray, dusty rose, or muted lavender for your primary nails, then select your accent nail on either the ring finger or middle finger for maximum impact. Apply your chosen glitter or metallic finish to create that perfect balance between simplicity and festivity. The contrast draws attention to your hands while complementing diverse outfits throughout your New Year’s celebrations.
Delicate Glitter Placement
Delicate glitter placement involves strategic application of minimal sparkle for a controlled, sophisticated effect that enhances rather than dominates your manicure. We apply glitter only to exact areas like the tips, in thin lines, or as small accents along the cuticle or nail edge to maintain that refined appearance.
For a confetti inspired look, place micro glitter in a scattered pattern across one or two nails while keeping the rest matte or glossy. This technique incorporates the celebratory spirit without overwhelming your overall design aesthetic. Apply the glitter over a clear base coat and seal with a top coat to ensure longevity throughout your festivities.
Target exact zones like the French tip area or create thin glitter lines parallel to your cuticles for added dimension. The key lies in restraint – less truly becomes more when executing these delicate sparkle accents.
Clean Lines with Metallic Details
Clean lines with metallic details enhance minimalist designs by adding structure and shine through precise geometric elements. We create thin silver or gold stripes, half moon accents at the base, or vertical stripes for a sunray effect that catches light beautifully under party lighting.
Use striping tape to achieve perfectly straight lines, then apply metallic foil or chrome polish for bold, futuristic looks without being overpowering. These details work exceptionally well when combined with monochromatic or pastel backgrounds for a cohesive, elegant style that transitions seamlessly from day to night celebrations.
Apply the metallic accents over a completely dry base coat, removing any tape while the metallic layer remains slightly wet for crisp edges. Finish with a quality top coat to protect your design and maintain that professional, salon quality appearance throughout your New Year’s festivities.
| Design Type | Key Features | Application Method |
|---|---|---|
| Single Accent Nail | One glitter/metallic nail per hand | Accent nail on ring or middle finger |
| Delicate Glitter | Thin/sparse glitter accents | Tips, cuticle, or confetti pattern |
| Clean Lines, Metallic | Metallic stripes, sunrays, half moon | Lines on solid/frosted base |


DIY Techniques for Creating New Years Sparkle Nail Designs

Creating stunning New Year’s sparkle nails at home becomes effortless when you master the right techniques and use quality materials. We’ve compiled the most effective methods to help you achieve professional looking results that’ll make your nails the star of any celebration.
Essential Tools and Materials
Base coats form the foundation of every successful sparkle design, with milky white, black, or nude tones offering varied effects for different looks. We recommend starting with these versatile options since they complement most glitter colors.
Glitter polish in silver, gold, green, or red provides the seasonal shine that captures New Year’s magic perfectly. These festive colors work beautifully alone or layered together for more complex designs.
Top coats protect your artwork and can dramatically change the final appearance, with matte finishes offering modern sophistication while glossy coats amplify sparkle intensity.
Makeup sponges make gradient application incredibly simple, allowing you to blend colors seamlessly from base to tip. These inexpensive tools create professional looking fades that brushes often can’t achieve.
Detailing tools like brushes, dotting tools, and toothpicks give you precision control for intricate work and accent placement. We find these essential for creating clean lines and perfect rhinestone positioning.
Decorative accents including rhinestones, foil, and striping tape add extra dimension and luxury to your designs. These elements transform basic glitter applications into show stopping masterpieces.
Step-by-Step Application Methods
Prepare your nails by cleaning, shaping, and pushing back cuticles before applying a protective base coat. This crucial first step ensures your design adheres properly and lasts longer.
Apply your chosen base color using steady, even strokes, whether you’re working with milky white, black, or nude polish. We suggest two thin coats rather than one thick application for better coverage and durability.
Create glitter gradients by painting glitter polish onto a makeup sponge, then gently pressing it onto your solid base color. Move the sponge upward so glitter concentrates most heavily at the nail tip, creating that coveted fade effect.
Layer different glitter sizes for maximum dimension, starting with a thin coat of fine glitter followed by chunky pieces for texture. We blend these layers with a clean brush or sponge to ensure smooth transitions.
Add decorative accents while your polish remains tacky, pressing rhinestones, foil pieces, or striping tape firmly into place. This timing ensures your embellishments bond securely without sliding around.
Seal everything with one or two layers of quality top coat, paying special attention to nail tips where wear typically begins. We always cap the free edge to prevent chipping and extend your manicure’s lifespan.
Longevity and Maintenance Tips
Use quality polish and top coat to prevent premature chipping and extend wear time significantly. We’ve found that investing in better products saves money long term by reducing the need for frequent touch ups.
Avoid prolonged water exposure and wear protective gloves when cleaning or doing dishes. Water weakens polish bonds and can cause glitter pieces to lift or separate from the base.
Touch up small chips immediately with matching polish and top coat to prevent further damage. We keep small brushes handy for these quick repairs that maintain your manicure’s pristine appearance.
Remove designs carefully using acetone based remover and cotton pads, followed by thorough nail and cuticle moisturizing. This gentle approach prevents nail damage and keeps your natural nails healthy between manicures.


Professional Salon Nail Designs for New Years Sparkle

Professional salons elevate New Year’s nail art through advanced techniques and premium materials that create stunning, long-lasting results. These expert approaches deliver the sophisticated sparkle and intricate details that make celebrations truly memorable.
Gel Polish Sparkle Options
Gel polish systems provide the foundation for durable, high-shine finishes that maintain their brilliance throughout your New Year’s festivities. Chrome finishes create mirror-like metallic effects that reflect light dramatically, transforming nails into captivating focal points. Holographic and glitter-infused gels offer multidimensional sparkle that shifts and changes as you move, creating an enchanting display perfect for party lighting.
Specialty formulations include duo-chrome and iridescent shades that provide shifting color effects under different lighting conditions. These advanced gel polishes adapt to various environments, ensuring your nails look stunning whether you’re under candlelight at dinner or bright LED lights on the dance floor. UV or LED lamp curing ensures each layer bonds perfectly, creating a chip-resistant finish that lasts well beyond the holiday season.
Acrylic Extension Designs
Acrylic extensions allow dramatic length and sculptural possibilities that transform nails into true works of art. Almond and stiletto shapes provide elegant canvases for layered glitter applications, rhinestone arrangements, and three-dimensional embellishments that catch light from every angle. Built-up glitter layers create depth and texture, while hand-placed gems add luxurious focal points that elevate the entire design.
Geometric patterns and delicate snowflake motifs showcase precision craftsmanship using adhesive-back rhinestones strategically placed for maximum impact. French tip variations featuring deep colors and metallic blocking create modern twists on classic elegance. Contrasting shades and metallic accents enhance the festive atmosphere while maintaining sophisticated appeal that transitions beautifully from holiday celebrations to elegant New Year’s events.
Nail Art Specialist Techniques
Specialist techniques transform basic manicures into masterpieces through expert application of advanced artistic methods. Hand-painted motifs featuring fireworks, stars, and “2025” numerals require steady hands and fine brush control to achieve crisp, detailed results. Ombre blending with glitter creates seamless color transitions that appear to glow from within, while foil application adds brilliant metallic highlights that complement the overall design theme.
Bejeweled and three-dimensional nail art reaches new heights through strategic placement of rhinestones, pearls, and microbeads in geometric or floral arrangements. Stamping and decal applications offer intricate, detailed designs like disco ball effects and seasonal symbols without requiring advanced hand-painting skills. Fine brushes and dotting tools enable precision work that ensures each nail tells its own unique story while contributing to a cohesive, festively elegant whole.


Conclusion
New Year’s celebrations deserve nails that sparkle as brightly as your excitement for the fresh start ahead. Whether you’ve chosen classic metallics or bold firework-inspired designs we’ve shared the techniques to make your manicure truly memorable.
The beauty of these sparkly nail designs lies in their versatility. From minimalist accent nails to dramatic rhinestone crowns there’s a perfect style waiting for every celebration and personality.
Remember that stunning New Year’s nails aren’t just about the sparkle – they’re about expressing your joy and confidence as you step into new possibilities. With the right techniques and a touch of creativity your nails will be the perfect finishing touch for your midnight celebration.
Frequently Asked Questions
What are the best nail colors for New Year’s celebrations?
Gold, silver, champagne, and rose gold are the most popular choices for New Year’s nail designs. These metallic tones capture the festive spirit and elegance of the celebration. Black and gold combinations also create sophisticated, dramatic looks that are perfect for midnight festivities.
How can I create a glitter gradient effect on my nails?
Start with a base coat, then apply your base color. Use a makeup sponge to dab glitter polish from the tip toward the middle of the nail, creating a gradual fade. Apply multiple thin layers for better coverage and finish with a top coat to seal the design.
What tools do I need for DIY New Year’s nail art?
Essential tools include base coat, top coat, glitter polishes, makeup sponges, striping tape, small brushes, rhinestones, sequins, and nail foil. Having quality tools ensures professional-looking results and makes the application process much easier.
How long do sparkly nail designs typically last?
With proper application and quality products, sparkly nail designs can last 7-14 days. Gel polish versions tend to last longer than regular polish. Using a good base coat and top coat, avoiding harsh chemicals, and wearing gloves during cleaning helps extend longevity.
Can I mix different metallic colors in one design?
Absolutely! Mixing metallics like gold and silver creates stunning gradient effects and adds visual interest. Use sponge blending techniques or strategic placement to combine different metallic shades. This approach creates dynamic, eye-catching designs perfect for celebrations.
What’s the difference between gel and regular polish for glitter nails?
Gel polish offers superior durability, lasting 2-3 weeks compared to regular polish’s 5-7 days. Gel provides a harder, more chip-resistant finish and requires UV/LED curing. However, regular polish is easier to remove and doesn’t require special equipment.
How do I safely remove glitter nail polish?
Soak cotton pads in acetone-based nail polish remover and place them on each nail. Wrap fingertips in foil and let sit for 10-15 minutes. Gently push off the softened polish. Avoid aggressive scraping, which can damage the nail surface.
Are rhinestones and sequins safe for nail art?
Yes, when applied correctly with nail glue or gel polish, rhinestones and sequins are safe for nail art. Ensure they’re firmly attached and sealed with top coat. Remove them gently during polish removal to avoid damaging the nail bed.
What’s the best base for applying metallic foil?
A tacky base coat or specialized foil adhesive works best for metallic foil application. The surface needs to be slightly sticky for the foil to adhere properly. Press the foil firmly and peel away quickly for clean transfers.
How can I make my New Year’s nail art last through the celebrations?
Apply a quality base coat, use thin layers of polish, and finish with a durable top coat. Avoid activities that could chip the nails, wear gloves when cleaning, and apply cuticle oil daily to maintain nail health and flexibility.