Square nails have become the ultimate canvas for festive nail art and we’re absolutely obsessed with how French tips transform into stunning Christmas masterpieces. There’s something magical about combining the classic elegance of French manicures with holiday sparkle that makes square-shaped nails pop like tiny presents on your fingertips.
We’ve discovered that square nails offer the perfect foundation for Christmas French tip designs because they provide more surface area to showcase intricate details. Whether you’re dreaming of snow-white tips with glittery accents or bold red French tips adorned with tiny holly leaves the possibilities are endless.
This holiday season we’re sharing our favorite French tip Christmas nail ideas specifically designed for square nails. From subtle winter wonderland themes to show-stopping holiday glamour these designs will have you spreading Christmas cheer with every gesture. Get ready to turn your square nails into the perfect holiday accessory that’ll have everyone asking where you got your nails done.
Classic Red and Green French Tip Christmas Nails for Square Shapes
Classic Christmas colors create timeless elegance on square nail shapes. These traditional combinations offer versatile options for holiday nail art that complement any festive outfit.
Traditional Holiday Color Combinations
Deep emerald green tips paired with crimson red bases deliver the most iconic Christmas nail look for square shapes. We love how the sharp edges of square nails showcase the clean lines between these contrasting colors. Forest green French tips over nude bases create a subtle yet festive appearance perfect for office holiday parties.
Burgundy and sage green combinations offer sophisticated alternatives to bright traditional colors. These muted tones work beautifully on square nails because the geometric shape emphasizes the color blocking effect. Wine red tips with olive green accent nails create depth in your Christmas manicure.
Candy cane inspired red and white stripes transform traditional French tips into playful holiday art. We recommend using the square nail’s flat surface to create precise alternating red and white diagonal stripes. This technique works especially well on longer square nails where you have more canvas space.
Gold accents with red and green bases elevate classic Christmas colors to glamorous heights. Metallic gold French tips over deep red create luxury appeal while gold glitter over emerald green adds sparkle. These combinations photograph beautifully under holiday lights.
Glossy Finish Techniques for Square Nails
High gloss top coats amplify color saturation on square Christmas nails more than any other finish. We apply two thin layers of premium top coat to achieve mirror like shine that makes red and green colors appear more vibrant. The flat surface of square nails reflects light evenly for maximum impact.
Gel polish systems provide longer lasting glossy results compared to traditional lacquers on square shapes. These formulas resist chipping at the sharp corners where square nails typically show wear first. We cure each layer properly to maintain that salon perfect shine throughout the holiday season.
Buffer techniques before polish application ensure smooth glossy finishes on square nail surfaces. We use a four way buffer to eliminate ridges and create the perfect base for high shine top coats. This preparation step prevents streaking and ensures even light reflection across the entire nail surface.
Multiple thin top coat layers build superior gloss compared to single thick applications on square Christmas nails. We wait 60 seconds between each thin layer to prevent bubbling and ensure proper adhesion. This technique creates depth that makes colors appear richer and more dimensional.
Glittery Gold French Tip Designs on Square Christmas Nails
 1")
We’re elevating square Christmas nails with stunning gold glitter French tips that capture the season’s glamorous spirit. These designs transform traditional French manicures into dazzling holiday statements.
Gold glitter tips create instant festive elegance when we apply them over clear or white base coats on square shaped nails. The angular edges of square nails provide the perfect canvas for showcasing the sparkling texture. We recommend using a high quality gold glitter polish that contains fine particles for smooth application and maximum shine.
Gold accent nails offer a balanced approach where we paint one or two nails with solid gold glitter polish while maintaining classic French tips on the remaining nails. This technique creates visual interest without overwhelming the overall design. We find this method particularly effective when we choose the ring finger and thumb as accent nails.
Gradient gold tips allow us to blend gold glitter from the tip toward the nail bed for a sophisticated ombre effect. Starting with concentrated glitter at the tip and gradually reducing density creates depth and dimension. We achieve this look by dabbing the brush lightly as we move down from the tip.
Champagne Gold Accent Options
Subtle champagne tips deliver understated luxury when we apply champagne gold polish to square nail tips over nude or cream colored base coats. This combination offers versatility for both professional settings and holiday celebrations. We prefer champagne gold shades with warm undertones that complement various skin tones.
Champagne gold stripes create sophisticated French tip designs when we use thin brushes to paint delicate lines along the nail tips. These precise stripes require steady hands but produce elegant results that stand out from traditional white French tips. We recommend practicing the stripe technique on nail wheels before applying to natural nails.
Textured champagne accents incorporate different finishes like matte champagne gold combined with glossy base colors for dimensional appeal. We layer matte top coat over selected areas while leaving others glossy to create contrast. This technique works exceptionally well on square nails where we can define clean geometric sections.
Rose Gold Holiday Variations
Rose gold tips bring modern festive flair when we paint square nail tips with rose gold polish over clear or white base coats. The warm pink undertones in rose gold complement winter skin tones beautifully. We find that rose gold French tips pair perfectly with neutral holiday outfits and add subtle glamour to any look.
Rose gold accent designs enhance overall manicures when we add small rose gold elements to ring fingers or thumbs through stripes or geometric shapes. These accents create focal points without dominating the entire nail design. We often incorporate tiny rose gold dots or triangular shapes at the base of accent nails for added detail.
Mixed metal combinations showcase both rose gold and champagne gold elements on different nails within the same manicure for ever-changing holiday nail art. We alternate between rose gold tips on some nails and champagne gold tips on others to create coordinated yet varied looks. This approach allows us to incorporate multiple trendy metallics while maintaining cohesive design principles.
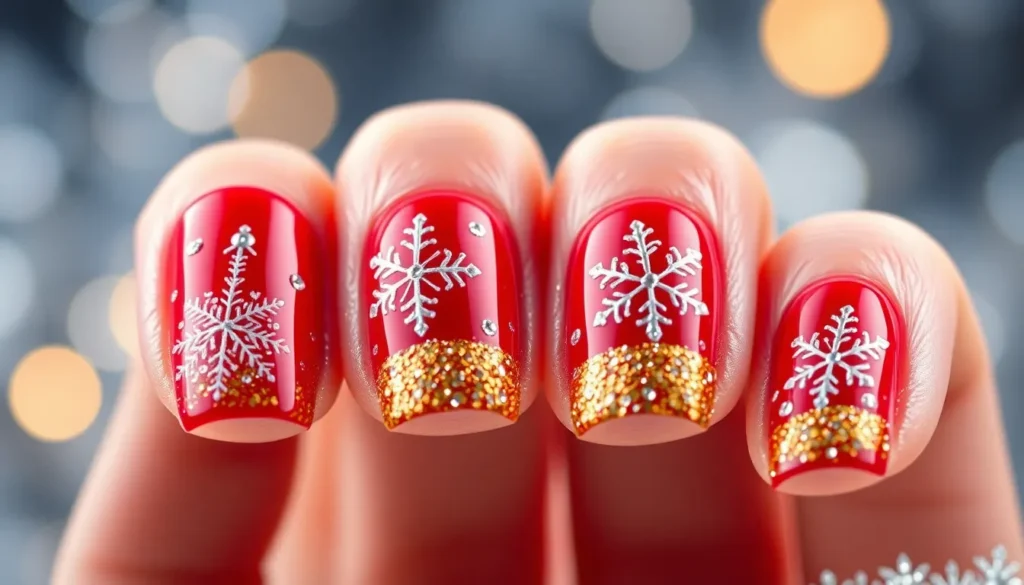
Winter Wonderland White French Tips with Snowflake Details
 2")
We’ll create magical winter nail art by combining crisp white French tips with delicate snowflake details on square nails. This elegant design captures the essence of winter while maintaining the classic sophistication of French manicures.
Delicate Snowflake Nail Art Techniques
Stencil method offers the most precise snowflake patterns for beginners who want professional results. We recommend placing nail art stencils over your white French tips and using silver or glitter polish to fill in the intricate designs.
Dotting tools create beautiful snowflake patterns through strategic dot placement and connecting lines. Start with a central dot on your nail tip, then add six smaller dots around it before connecting them with thin lines using a nail art brush.
Stamping plates provide consistent snowflake designs across all nails without requiring artistic skills. We suggest using stamping plates specifically designed for snowflake patterns, as they’ll give you detailed impressions that look hand painted.
Freehand painting allows for unique snowflake designs using a fine nail art brush. Begin with simple six pointed stars, then add delicate branches and smaller details using white or silver polish over your French tips.
Matte White Finish Applications
Matte top coat application transforms glossy snowflake designs into sophisticated winter art with a flat, velvety finish. We apply this specialized top coat as the final step after all snowflake details have completely dried.
Buffering technique creates a matte effect by gently buffing the surface of regular top coat with a fine grit buffer. This method works well when you don’t have matte top coat available and need immediate results.
Steam method uses facial steamer on slightly wet nails to quickly achieve a matte appearance without additional products. Hold your finished nails about 6 inches from the steamer for 10 seconds to create the desired flat finish.
Rhinestone accents add sparkle to matte snowflake designs by placing small crystals at snowflake centers or along nail edges. We position these accent pieces while the base coat is still slightly tacky for better adhesion.
Festive Plaid French Tip Patterns for Square Holiday Nails
 3")
We’re taking Christmas nail art to the next level with plaid patterns that transform traditional French tips into festive masterpieces. These classic textile designs bring warmth and holiday cheer to your square nails while maintaining sophisticated elegance.
Buffalo Check Design Methods
Creating the perfect buffalo check pattern starts with alternating red and black squares on your nail tips. We recommend using a high-quality red base color for the tip area before adding the signature checkered squares. Apply the red polish in smooth, even strokes to create your French tip foundation.
Paint black squares directly onto the red tip using a small detail brush or nail art pen. The key to achieving crisp buffalo check lies in maintaining consistent square sizes across all nails. We suggest practicing the pattern on a nail wheel first to perfect your technique.
Add a thin green line around the tip edge to represent holly for extra festive appeal. This small detail transforms the classic buffalo check into a distinctly Christmas design. Use a striping brush dipped in emerald green polish to create this delicate accent line.
Seal your buffalo check design with a glossy top coat to protect the intricate pattern. The multiple layers of polish in this design require extra protection to prevent chipping. We recommend applying two thin coats of top coat for maximum durability.
Tartan Pattern Variations
Tartan patterns involve multiple colors intersecting in grid-like designs that capture the essence of holiday tradition. For Christmas themed tartans, we focus on red and green stripes intersecting with cream or white accents. The square shape of your nails provides the perfect canvas for these intricate geometric patterns.
Paint a base coat that matches the dominant color of your chosen tartan pattern before creating the intersecting stripes. We typically start with a deep red or forest green base, allowing it to dry completely before adding the contrasting stripe elements. This foundation color should extend beyond the traditional French tip area to accommodate the full tartan design.
Use nail tape to create precise striped patterns on the tip area for professional looking results. Apply thin strips of nail tape in parallel lines across the tip, then brush contrasting colors between the tape guides. Remove the tape while the polish is still slightly wet to avoid peeling.
Incorporate small holly sprigs or tiny Christmas bells on accent nails to enhance the festive appeal. We suggest limiting these embellishments to one or two nails per hand to maintain balance. Place these decorative elements at the base of the tartan tip or along the nail’s side edge for optimal visual impact.
Finish with a high gloss top coat to unify all the pattern elements and create a cohesive look. The multiple colors and intersecting lines in tartan designs benefit from a strong top coat that smooths any texture variations. This final step ensures your festive plaid French tips maintain their crisp appearance throughout the holiday season.
Elegant Silver and Blue French Tip Christmas Nail Art
 4")
We’re embracing sophisticated winter elegance with silver and blue French tip designs that perfectly complement square nail shapes. These color combinations create stunning holiday looks that feel both festive and refined.
Icy Blue Winter Themes
Icy blue polish transforms your square nails into a winter wonderland that captures the season’s magical essence. We recommend applying the blue shade to your entire nail base for maximum impact, creating a striking foundation that mimics frozen lakes and winter skies. Silver tips add luxurious contrast against the cool blue backdrop, giving your manicure an expensive salon finish.
Winter themed accents enhance the icy blue base with delicate details like painted snowflakes, frost patterns, or crystalline designs. We suggest using a fine detail brush to create small ice crystals along the nail edges, adding depth and visual interest to your square canvas. Combining different shades of blue creates an ombre effect that transitions from deep navy at the cuticle to pale ice blue at the tips.
The square shape provides ideal space for intricate winter motifs that wouldn’t work as well on rounded nails. We can incorporate subtle glitter particles within the blue polish to mimic sparkling snow, creating movement and dimension under different lighting conditions.
Metallic Silver Accent Techniques
Metallic silver polish elevates Christmas nail art beyond traditional French tips by creating sophisticated patterns and designs. We’re using silver not just for the tip line but throughout the nail design, incorporating it into snowflake centers, garland details, and even miniature Christmas tree silhouettes that follow the nail’s square edges.
Intricate silver patterns work beautifully when applied over darker base colors like deep blue or navy. We recommend using a small striping brush to create delicate silver vines, holly branches, or geometric patterns that complement the square nail shape. These metallic accents catch light beautifully, adding glamour to your holiday look.
Silver foil application creates dramatic texture that’s perfect for special holiday events. We can apply the foil in strategic sections of the nail, creating contrast between matte base colors and shimmering metallic areas. Stamping plates offer another precise method for applying consistent silver designs across all ten nails.
Layering different silver finishes adds complexity to your manicure without overwhelming the overall design. We suggest combining matte silver elements with high shine metallic accents, creating visual depth that makes your square nails truly stand out during holiday celebrations.
Christmas Tree French Tip Designs for Square Nail Shapes
 5")
We’re transforming your square nails into festive canvases with charming Christmas tree French tip designs that perfectly capture the holiday spirit. Square nail shapes provide an ideal foundation for intricate tree details, offering the precision needed for these seasonal masterpieces.
Miniature Tree Art Applications
Stamping techniques offer the quickest route to achieving professional looking Christmas tree tips on your square nails. We recommend using specialized nail stamps or pre-made stickers to create consistent evergreen designs across all ten fingers, ensuring each tree maintains perfect symmetry on your square nail shape.
Hand painting methods deliver the most personalized Christmas tree French tips using detail brushes and quality nail polish. Start by sketching small triangular outlines at each nail tip, then fill in with deep forest green while adding dimensional branches using lighter green shades. Small brown trunk details at the base of each tree complete the miniature forest effect.
Santa hat combinations elevate traditional tree designs by adding festive red caps to select trees across your manicure. Paint your Christmas trees as usual, then crown 2-3 trees per hand with tiny red triangular hats topped with white pom poms for a whimsical holiday touch.
Green Gradient Techniques
Gradient tip effects create stunning depth by transitioning from light sage green at the cuticle area to rich emerald at your square nail tips. We achieve this look using makeup sponges to blend colors seamlessly, building up layers until the gradient appears smooth and professional.
Evergreen leaf patterns transform classic French tips by incorporating rows of delicate pine needles along the tip line. Use a fine detail brush to paint individual leaf shapes in varying green tones, creating texture that mimics real evergreen branches while maintaining the clean lines that square nails showcase beautifully.
Ombre tree silhouettes combine gradient backgrounds with solid tree shapes for dimensional appeal. Apply your green gradient base first, then use black or dark green polish to paint simple tree outlines over the blended background, creating striking contrast that emphasizes your square nail edges.
Candy Cane Striped French Tips on Square Christmas Nails
 6")
Transform your square Christmas nails into festive masterpieces with candy cane striped French tips that capture the sweet essence of the holiday season. These playful designs offer a delightful twist on traditional French manicures while maintaining elegant sophistication.
Red and White Stripe Methods
Creating perfect candy cane stripes requires strategic application techniques for professional looking results. We recommend starting with a neutral or milky white base coat to enhance the vibrancy of the red stripes and create stunning contrast.
Striping tape method delivers the most precise results for square nail tips. Apply thin striping tape diagonally across each nail tip, ensuring even spacing between lines. Paint alternating sections with bright red polish, then carefully remove the tape while the polish remains slightly wet.
Freehand diagonal stripes work beautifully when you want a more organic, handcrafted appearance. Use a thin detail brush to paint red diagonal lines across white French tips, creating the classic candy cane pattern. The key lies in maintaining consistent angles and spacing across all ten nails.
Glitter outline enhancement elevates the basic stripe design with festive sparkle. Add silver or gold glitter along the edges of each stripe for a frosty, wintry effect that catches light beautifully. This technique works particularly well for holiday parties and special events.
Peppermint Swirl Variations
Classic peppermint swirls create whimsical French tips that resemble beloved holiday candies. Start with a white or milky base, then use a fine brush to paint curved red lines forming spiral patterns on each square tip. The swirl should flow naturally from one corner to the other.
Partial swirl designs offer a more subtle approach to peppermint nail art. Instead of covering the entire tip, create smaller swirl accents combined with glitter details. These miniature peppermint patterns work exceptionally well when paired with other Christmas elements like tiny snowflakes.
Dotted peppermint patterns provide an alternative to traditional swirls while maintaining the candy theme. Create small peppermint circles using a dotting tool, alternating between solid red dots and red and white swirled dots across the nail tips. This variation adds playful texture without overwhelming the overall design.
Snowy backdrop enhancement amplifies the winter candy theme using a milky or pearl white base. This creates a clean, sophisticated foundation that makes the red peppermint elements pop dramatically. The snowy base also provides the perfect canvas for adding tiny sparkle accents or winter themed embellishments.
Holiday Rhinestone French Tip Accents for Square Nails
 7")
Square nails provide the perfect canvas for glamorous rhinestone accents that transform traditional French tips into dazzling holiday masterpieces. We’ll explore strategic crystal placement techniques and stunning color combinations that elevate your festive nail art.
Crystal Placement Techniques
Line placement creates the most dramatic impact by positioning crystals in a straight line along the free edge of your square nail. This technique emphasizes the clean geometric shape while adding sophisticated sparkle to your French tip design.
Pintuck arrangement involves clustering small groups of rhinestones near the tip corners for added dimension and visual interest. We recommend placing 2-3 crystals in each corner to create balanced symmetry across your square nail shape.
Tip embellishment centers larger rhinestones on the nail tip while flanking smaller crystals on both sides for a graduated effect. This creates a focal point that draws attention to the square French tip’s clean lines.
Securing your rhinestones requires nail glue or a thick top coat for initial placement. Apply a second layer of top coat after crystal placement to ensure maximum durability throughout the holiday season.
Gemstone Color Combinations
Red and green rhinestones represent the quintessential Christmas palette when paired with white or milky base colors. These traditional colors create instant holiday recognition while maintaining elegant sophistication on square nails.
Gold and silver crystals deliver festive metallic shimmer that catches light beautifully against French tip backgrounds. Mix both metals along the tip edge for a luxurious multi-dimensional effect that complements any holiday outfit.
Multicolored gems incorporate red, green, gold, and silver stones for a playful celebratory appearance. Apply these combinations as accent gradients blending into your main nail color or position them strategically along the French tip edge.
| Feature | Details |
|---|---|
| Base Color | White, milky, or soft pastel |
| Tip Accent | Rhinestones, glitter, metallic outlines |
| Crystal Placement | Line, pintuck, centered tip |
| Gemstone Colors | Red, green, gold, silver, multicolored |
Ombre French Tip Christmas Designs for Square Nail Art
 8")
Square nails provide the perfect canvas for creating stunning ombre French tip designs that blend festive colors seamlessly. We’ll explore gradient techniques that transform traditional French tips into holiday masterpieces.
Red to Green Gradient Methods
Achieving the perfect red to green gradient starts with proper preparation and the right tools. We recommend beginning with a clear or light-colored base coat to create a smooth foundation for color application.
Color application techniques involve dabbing thin layers of red polish near the tip area first. Gradually blend green polish as you move toward the center of the nail using controlled movements. Use a makeup sponge to softly dab the transition area between colors for seamless blending.
Professional blending methods require patience and multiple thin layers rather than one thick application. Apply the red polish to one section of your makeup sponge and green to another section. Press the sponge gently onto the nail tip while rocking it slightly to create the gradient effect.
Finish your gradient design with a high-quality top coat to seal the colors and add brilliant shine. Allow each layer to dry completely before applying the final protective coating for maximum durability throughout the holiday season.
Multi-Color Holiday Blending
Multi-color blending techniques expand beyond traditional two-tone gradients to incorporate gold, silver, deep blue, and white shades. Start with a neutral or subtle glitter base that won’t compete with your festive color palette.
Layer colors strategically using a small detail brush or cosmetic sponge to apply different shades in sections along the nail tip. Create stripes or geometric patterns with your chosen holiday colors before blending the edges together.
Blending multiple shades requires careful attention to color placement and transition points. Overlap colors where they meet using gentle dabbing motions to ensure smooth transitions between each festive hue.
Decorative accents can elevate your multi-color design with strategic placement of glitter particles, miniature snowflakes, or small gemstones. Add these embellishments while the final color layer is slightly tacky for better adhesion and professional results.
Matte Finish French Tip Christmas Nails in Square Style
 9")
Matte finishes transform classic French tip Christmas nails into sophisticated holiday statements that capture attention with their understated elegance. Square nail shapes provide the perfect canvas for these refined textures, creating a modern twist on traditional festive designs.
Velvet Texture Applications
Applying velvet textures creates an irresistibly soft and luxurious finish that elevates your Christmas nail art to new heights. We recommend using specialized velvet top coats over your base French tip design to achieve this sumptuous effect. The texture pairs beautifully with traditional Christmas colors like deep burgundy or classic red, adding depth and richness to your square nails.
Velvet nail polish systems offer another approach to achieving this coveted texture, with formulations specifically designed to create that soft, touchable surface. These polishes work exceptionally well on square nail shapes because the flat surface area maximizes the velvet effect’s visual impact. Layer the velvet texture over metallic gold bases for a stunning contrast that combines sophistication with festive glamour.
Creating contrast combinations becomes effortless when you alternate between matte and velvet textures across different nails. Try applying velvet texture to your accent nails while keeping the remaining nails in classic matte finishes. This technique adds visual interest without overwhelming the overall design, perfect for formal holiday events or elegant Christmas celebrations.
Color Combinations for Matte Effects
Classic red and green combinations take on new sophistication when rendered in matte finishes on square Christmas nails. Deep emerald green French tips paired with matte burgundy bases create an elevated version of traditional holiday colors. These rich, saturated tones look particularly striking when enhanced with subtle glitter stripes or delicate snowflake decals along the nail edges.
Metallic gold and matte burgundy pairings offer the perfect balance between glamour and refinement for your holiday nail art. Apply metallic gold as French tips over matte burgundy bases, or reverse the combination for a different look. Incorporate half moon designs or subtle ombre effects to add sophisticated detail that complements the square nail shape beautifully.
Winter white and silver combinations create a serene, elegant aesthetic that captures the essence of a winter wonderland. Matte white bases with metallic silver French tips evoke fresh snowfall and icy elegance. These color combinations work particularly well with subtle pearl accents or delicate silver striping that follows the natural lines of your square nail shape.
Deep jewel tone applications in matte finishes provide rich, luxurious alternatives to traditional Christmas colors. Sapphire blue, amethyst purple, and emerald green in matte formulations create sophisticated holiday looks that stand out from typical red and green schemes. These colors pair beautifully with gold or silver metallic accents for added festive sparkle.
Conclusion
We’ve explored an incredible range of festive possibilities for transforming your square nails into stunning holiday masterpieces. From shimmering gold glitter tips to elegant winter wonderland designs each technique offers its own unique charm for the Christmas season.
The versatility of square nails truly shines when paired with these creative French tip variations. Whether you prefer the classic elegance of red and green combinations or the modern sophistication of matte finishes there’s a perfect design waiting for your next holiday celebration.
Remember that the key to achieving professional-looking results lies in quality products proper preparation and patience during application. With these festive French tip ideas you’ll have gorgeous Christmas nails that capture the magic of the season while showcasing your personal style.
Frequently Asked Questions
What makes square nails ideal for Christmas French tip nail art?
Square nails provide ample surface area that makes them perfect for intricate holiday designs. The flat, wide tip offers more space for detailed artwork like snowflakes, plaid patterns, and rhinestone accents. This shape allows nail artists to create more elaborate Christmas-themed French tips compared to other nail shapes.
What are the best color combinations for Christmas French tip nails?
Classic red and green combinations offer timeless elegance, with deep emerald tips and crimson bases. For sophisticated looks, try muted tones like burgundy and sage green. Candy cane-inspired red and white stripes add playful charm, while gold and silver accents create glamorous holiday appeal.
How can I achieve a long-lasting glossy finish on my Christmas nails?
Use high-quality gel polish systems and apply multiple thin layers of glossy top coat for maximum durability. Buffer your nails smooth before application, and ensure each layer is completely dry. Gel systems typically last longer than regular polish and maintain their vibrant shine throughout the holiday season.
What techniques work best for creating snowflake nail art on square nails?
You can use nail stencils for precision, dotting tools for unique patterns, or stamping plates for consistency. Freehand painting allows for personalized designs. Start with a white or clear base, then add delicate snowflake details using a fine brush or dotting tool for best results.
How do I create perfect plaid patterns for Christmas French tips?
Start with a high-quality red base color and use a small detail brush to paint black squares for buffalo check. Add thin green lines for holly effects. For tartan patterns, create intersecting red and green stripes with cream accents. Use nail tape for precise lines and seal with glossy top coat.
What’s the best way to apply rhinestones to Christmas French tip nails?
Place rhinestones strategically using tweezers while the top coat is still slightly tacky. Try line placement along the tip edge for drama, centered arrangements for focal points, or scattered placement for sparkle. Use red and green stones for classic Christmas looks, or gold and silver for luxury appeal.
How do I create smooth ombre effects on Christmas French tips?
Start with a clear or light base coat, then use a makeup sponge to blend colors seamlessly. Apply your chosen colors (like red to green gradient) to the sponge and dab gently onto the nail tip. Work quickly while polish is wet and seal with top coat for smooth transitions.
What’s the difference between matte and glossy Christmas nail finishes?
Matte finishes create sophisticated, velvety textures that transform traditional designs into elegant statements. Use specialized matte top coats or velvet nail polish systems. Glossy finishes offer vibrant shine and color depth, best achieved with gel systems and multiple thin top coat layers for maximum impact.