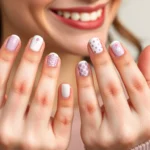
We’ve all been there – staring at our bare toenails and wondering how to make them look salon-worthy without very costly or spending hours perfecting intricate designs. The good news? You don’t need to be a nail art expert to create stunning toe nail designs that’ll have everyone asking where you got your pedicure done.
Simple doesn’t mean boring when it comes to toe nail art. With just a few basic tools and techniques we’ll share with you, you can transform plain nails into eye-catching masterpieces in minutes. From classic French tips with a twist to playful polka dots and elegant stripes, we’ve compiled the most beginner-friendly designs that guarantee impressive results every time.
Whether you’re prepping for sandal season or just want to add some flair to your everyday look, these easy toe nail designs will boost your confidence and save you money. Let’s jump into creating beautiful nails that look professionally done – right from your own home.
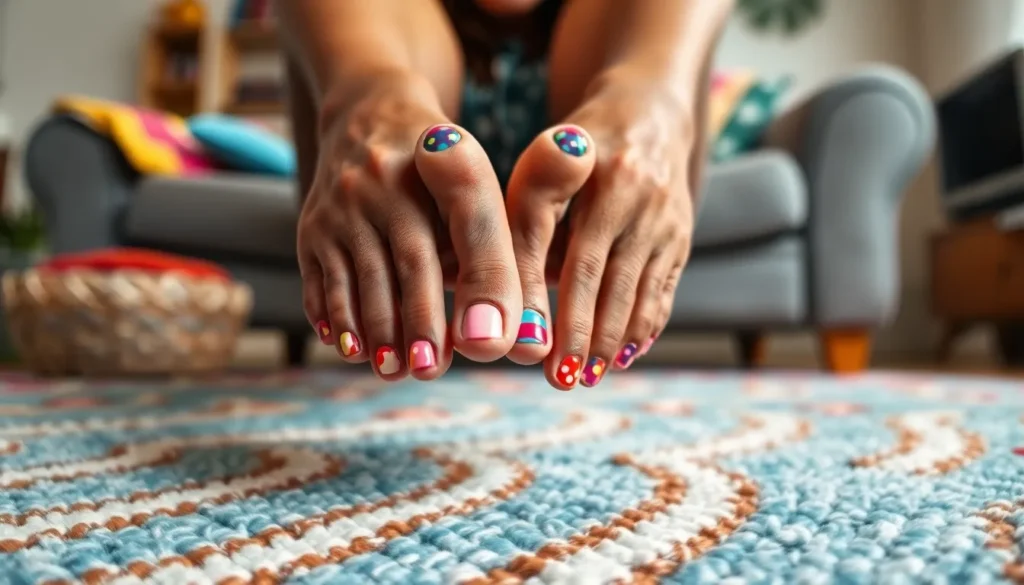
Simple Polka Dot Toe Nail Designs
Polka dots transform ordinary toenails into playful works of art with minimal effort required. We’ll show you two foolproof methods that guarantee stunning results every time.
Using a Dotting Tool for Perfect Circles
Dotting tools create consistently sized circles that make your toe nail designs look professionally crafted. We recommend starting with a base coat in your favorite color and allowing it to dry completely before adding dots.
Select contrasting colors like white dots on navy blue or gold dots on burgundy for maximum visual impact. Dip the dotting tool into your chosen polish and gently press it onto the nail surface without dragging or twisting the tool.
Practice the spacing on a piece of paper first to get comfortable with dot placement. We suggest creating a triangular pattern on the big toe and smaller random dots on the remaining toes for an effortlessly chic look.
Vary the dot sizes by using different ends of the dotting tool or applying varying pressure. Large dots work beautifully as accent pieces while smaller dots fill negative space perfectly.
Creating Dots with Bobby Pins or Toothpicks
Bobby pins and toothpicks serve as excellent alternatives when professional dotting tools aren’t available. We’ve found that bobby pins create medium sized dots while toothpicks produce smaller more delicate circles.
Prepare your makeshift tools by cleaning them thoroughly with rubbing alcohol to ensure smooth polish application. Dip the round end of a bobby pin or the tip of a toothpick into your dot color and test the size on your thumb nail first.
Work quickly since polish on these improvised tools dries faster than on professional dotting tools. We recommend having a small amount of polish remover nearby to clean your tool between different colored dots.
Create texture variation by using the side of a toothpick for oval shapes or pressing lightly for gradient effects. This technique adds visual interest and makes your simple polka dot design appear more sophisticated.
Classic French Pedicure Variations

French pedicures remain one of the most elegant and versatile nail art options for beginners. These timeless designs offer endless possibilities for customization while maintaining their sophisticated appeal.
Traditional White Tip French Design
We start with the classic white tip French design that creates a clean and elegant look suitable for any occasion. Paint the nail tip with white polish using steady, even strokes to achieve the signature crisp line. This traditional approach works best when you apply a base coat first, followed by a neutral or clear base color.
The white tip should cover approximately one-third of your toenail, creating a natural crescent shape that follows your nail’s curve. We recommend using a high-quality white polish that provides good coverage in one or two coats. Practice makes perfect with this technique, so don’t worry if your first attempts aren’t salon-perfect.
Colorful Twist on the French Manicure
We can easily modernize the traditional French pedicure by replacing white tips with pastel, neon, or glitter polish for a contemporary update. Choose colors that complement your skin tone or match your outfit for a coordinated look. Bold colors like coral, mint green, or lavender create stunning alternatives to the classic white.
Tape becomes your best friend when creating sharp, colored tips that rival professional results. Apply scotch tape just above where you want your colored tip to begin, then paint over it with your chosen color. Remove the tape while the polish is still slightly wet to reveal crisp, clean lines.
We can also add small decorative elements like dots or stripes at the tip for extra flair. Create tiny dots using a dotting tool or toothpick in contrasting colors, or add thin stripes using a nail art brush for a more complex design. These small details transform a simple French pedicure into a personalized work of art.
Geometric Stripe Patterns

Geometric designs bring a modern edge to toe nail art while remaining surprisingly simple for beginners. We recommend starting with stripe patterns since they require minimal tools and deliver maximum impact.
Horizontal Stripes Using Tape
Horizontal stripes create a playful, contemporary look that’s perfect for summer sandals. We begin by applying a base coat and allowing it to dry completely before moving to the next step.
Place strips of tape horizontally across each nail, leaving even gaps between them to ensure uniform stripes. We suggest using painter’s tape or scotch tape for the cleanest results. Paint your chosen contrast color over the exposed nail areas, covering the entire surface smoothly.
Remove the tape while the polish is still slightly wet to prevent peeling or chipping. This technique gives us sharp, professional looking lines without requiring steady hands or artistic skills.
Vertical Lines for Elongated Look
Vertical stripes visually lengthen toes and create an elegant, sophisticated appearance. We apply the same tape method but position strips vertically instead of horizontally.
For beginners, we recommend starting with one thick stripe down the center of each nail or two thinner stripes along the edges. This simplified approach reduces complexity while still achieving a chic result.
Advanced beginners can experiment with freehand vertical lines using a striping brush for creative variation. We find that alternating colors between toes or adding accent nails with complementary designs enhances the overall look.
These geometric stripe techniques help us achieve salon quality results at home with accessible household items and simple steps.
Floral Accent Nail Art

We’ll transform your toenails into miniature gardens with these beginner-friendly floral designs that require minimal tools and maximum creativity.
Easy Daisy Designs with Dotting Tools
Daisy patterns become effortless when we use the five-dot technique with our dotting tools. Start by selecting a bright base color like sunny yellow or soft pink for your toenail foundation. Place five dots in a circular pattern using your dotting tool, creating the classic daisy petal shape around an imaginary center point.
Color combinations work best when we choose contrasting shades for maximum visual impact. White petals with yellow centers create a classic daisy look, while purple petals with white centers offer a more whimsical approach. We recommend practicing this pattern on a nail wheel first to perfect your spacing and pressure control.
Tool selection matters significantly for achieving professional-looking results. Use different sized dotting tools to create varied effects – larger tools for bold statement flowers and smaller ones for delicate accent blooms. If you don’t own dotting tools, bobby pins or toothpick ends serve as excellent alternatives for creating these charming daisy designs.
Simple Rose Patterns for Big Toes
Rose creation begins with forming a small circle at the center of your big toe using a larger dotting tool. This central dot becomes the heart of your rose, so choose a deeper shade of your main color to add dimension. Pink and red tones work beautifully, but don’t hesitate to experiment with unconventional colors like deep purple or coral.
Petal formation requires curved strokes that spiral outward from your center dot. Use a smaller dotting tool to create curved lines that wrap around the center, building layers as you work outward. Each stroke should flow naturally into the next, creating the organic shape that makes roses so appealing.
Depth techniques enhance your rose design through strategic color layering. Apply lighter shades on the outer petals and deeper tones toward the center to create realistic shadowing effects. We suggest using two to three shades of the same color family for the most natural-looking results.
Finishing touches complete your rose with small green dots or curved lines representing leaves at the base. This simple addition grounds your floral design and adds that professional polish that separates amateur attempts from salon-quality results.
Gradient Ombre Effects

We’ll master the art of gradient effects that seamlessly blend colors from light to dark across your toenails. This technique creates sophisticated transitions that rival professional salon work.
Two-Color Fade Technique
Choose two complementary colors that transition beautifully together, such as pink to coral or blue to purple. We recommend starting with lighter shades at the base and gradually building toward darker tones at the tips.
Apply your base coat first, then paint the lighter color across the entire nail surface. While the polish remains slightly wet, carefully apply the darker shade to the upper third of your toenail.
Blend the colors immediately using gentle dabbing motions with a clean makeup sponge. We work quickly here since nail polish dries fast, and you’ll want to achieve that seamless transition before it sets.
Build up the gradient gradually by repeating thin layers rather than applying thick coats. This method prevents streaking and creates a more professional looking fade effect.
Sponge Application Method
Gather a clean makeup sponge and cut it into small sections for easier handling on your toenails. We prefer wedge shaped sponges since they fit better around the curved nail surface.
Paint stripes of your chosen colors directly onto the sponge, overlapping them slightly where you want the blend to occur. This technique works exceptionally well with three to four colors for a rainbow effect.
Dab the sponge onto your nail using a gentle pressing motion rather than wiping or dragging. We rotate the sponge slightly between dabs to create different textures and color combinations.
Clean up immediately around your cuticles using a small brush dipped in nail polish remover. The sponge method can create some messiness, but this cleanup step ensures crisp, professional looking edges.
Seal your design with a high quality top coat to smooth out any texture from the sponge application and add brilliant shine to your gradient masterpiece.
Minimalist Single Color Designs

Single color applications offer the perfect starting point for toe nail art beginners. These designs require minimal tools while delivering maximum impact for everyday wear.
Nude and Neutral Shades
Nude ombre creates a sophisticated gradient effect by gradually blending light to dark nude shades across our toenails. We recommend starting with the lightest shade on the big toe and progressively deepening the color toward the pinky toe for a natural flow.
Neutral geometric patterns transform simple base colors into modern art pieces. Chevron designs work particularly well with beige or taupe polishes, while simple stripes in cream or soft gray add visual interest without overwhelming the natural nail bed. These patterns require only tape and a steady hand to achieve professional results.
Classic single shade applications remain timeless for their simplicity and versatility. We suggest choosing one consistent color across all ten toes for a clean, polished appearance that complements any outfit or occasion.
Accent nail techniques involve painting one toenail a different shade from the remaining nine. This approach works beautifully with neutral palettes, such as painting four toes in soft pink and the big toe in deeper rose or burgundy for subtle contrast.
Bold Bright Summer Colors
Polka dot borders create playful summer designs using vibrant seasonal colors along the bottom edge of each toenail. We recommend coral, turquoise, or sunny yellow as base colors with contrasting white or bright pink dots for maximum visual impact.
Floral accent patterns bring garden freshness to summer pedicures using dotting tools for small flower designs. Single flower applications on the big toe work well with bright base colors like electric blue or hot pink, while curly line details add professional finishing touches.
Solid bright applications showcase summer’s boldest shades without additional embellishments. Orange, lime green, and fuchsia deliver instant summer vibes while remaining simple enough for beginners to apply evenly across all toes.
Color blocking techniques involve alternating between two or three bright summer shades across different toes. We suggest pairing complementary colors like purple and yellow or using analogous combinations such as pink, coral, and orange for harmonious summer looks.
Glitter and Sparkle Accents

Sparkle transforms simple toenails into dazzling statement pieces that catch the light beautifully. We’ll show you effortless ways to incorporate glitter into your pedicure routine without overwhelming your design.
Full Glitter Coverage on Accent Nails
Choose one or two toenails to cover completely with glitter polish for maximum visual impact. We recommend selecting your big toes as accent nails since they provide the largest surface area for showcasing sparkle. Apply your base color first and let it dry completely before adding the glitter layer.
Start with a high-quality glitter polish that offers good coverage in just two coats. We’ve found that chunky glitter polishes work best for full coverage designs since they create more dimension and catch light from multiple angles. Dense glitter formulas eliminate the need for multiple layers and prevent the polish from becoming too thick.
Alternate between your accent nails and regular polish on the remaining toes for a balanced look. We suggest using a complementary solid color on your other toenails that matches one of the glitter colors. This creates cohesion while keeping the focus on your sparkling accent nails without overwhelming the entire foot.
Glitter Tips and Gradients
Apply glitter polish to just the tips of your toenails for a subtle sparkle effect that’s perfect for beginners. We recommend using tape or nail guides to create clean lines at the tip, similar to a French pedicure technique. This method gives you the glamour of glitter without committing to a full glitter nail.
Create stunning gradient effects by layering different glitter polishes from light to dark across your nail. We start with the lightest glitter shade at the base and gradually build up to darker or more intense glitter toward the tip. Use a small makeup sponge to dab and blend the colors together for a seamless transition.
Build your gradient gradually with thin layers to avoid streaking or clumping. We apply each glitter layer while the previous one is still slightly tacky, which helps the colors blend naturally. Work quickly but carefully, dabbing rather than brushing to maintain the gradient effect and prevent disturbing the underlying layers.
Experiment with different glitter sizes and colors within the same gradient for added dimension. We combine fine glitter with chunky pieces or mix warm and cool tones to create unique effects. This technique adds visual interest and makes each nail look like a tiny work of art that sparkles from every angle.
Seasonal Holiday Themes

Holiday inspired toenail designs let us celebrate special occasions with festive flair that’s surprisingly easy to achieve. These seasonal designs transform our pedicures into themed celebrations that perfectly complement our holiday outfits.
Christmas Red and Green Combinations
Traditional Christmas stripes bring festive cheer to our toenails using alternating red and green lines across each nail. We can create these stripes by applying a red base coat then using striping tape to section off areas for green polish application.
Candy cane accent nails showcase the holiday spirit with red and white diagonal stripes on our big toes while keeping other nails solid red. The diagonal pattern mimics classic candy cane designs and we can achieve this look using thin nail art brushes or striping tape.
Holly inspired dots combine red berries with green leaves for a nature themed Christmas design. We start with a clear or nude base then use a dotting tool to place three small red dots together topped with two small green oval shapes to represent holly leaves.
Christmas tree silhouettes work beautifully on our big toenails using green triangle shapes with tiny red dots for ornaments. We can paint a simple green triangle then add small red dots using a toothpick for an adorable miniature tree effect.
Summer Beach-Inspired Designs
Ocean wave patterns capture the essence of summer using blue and white polish to create flowing wave designs across our toenails. We apply a light blue base then use a thin brush to create white curved lines that mimic natural wave movements.
Tropical sunset ombres blend warm oranges, pinks, and yellows to recreate beautiful beach sunsets on our nails. We start with yellow at the base, blend orange in the middle, and finish with pink at the tips using makeup sponges for smooth color transitions.
Seashell accent designs feature simple shell shapes painted in white or pearl polish on ocean blue backgrounds. We can create basic shell outlines using thin brushes then fill them with shimmery polish for an authentic beach inspired look.
Sand and surf combinations use nude or beige polish as sand with blue tips representing water meeting the shore. We apply the nude base color then use a makeup sponge to dab blue polish on the tips, creating a natural beach scene effect.
Essential Tools and Supplies for Beginners

Getting started with toe nail art becomes effortless once you have the right tools and supplies. We’ve curated this essential collection to help you create stunning designs without very costly.
Basic Nail Polish Collection
Classic foundation colors form the backbone of any beginner’s nail polish arsenal. We recommend starting with versatile shades like soft pink, cherry red, crisp white, and crystal clear base that work across multiple design techniques. These four colors alone enable you to create French tips, polka dots, stripes, and accent nail combinations.
Neutral tones expand your creative possibilities while maintaining a sophisticated appearance. Add nude beige, soft taupe, and classic black to your collection for minimalist designs and elegant color blocking effects. These shades complement the seasonal holiday themes and geometric patterns we’ve discussed throughout this guide.
Seasonal accent colors bring variety to your toe nail art throughout the year. Include ocean blue and sunny yellow for summer beach designs, plus festive green for Christmas inspired patterns. We suggest choosing 2-3 seasonal shades that match your wardrobe and personal style preferences.
Must-Have Application Tools
Base coat application protects your natural nails while ensuring polish adhesion lasts longer. We always apply a quality base coat before any design work to prevent staining and create a smooth foundation. This step becomes especially important when working with darker colors or glitter accents.
Precision brushes enable detailed work for floral designs, geometric patterns, and cleanup around cuticles. Include small detail brushes, striping brushes, and flat shader brushes in your toolkit for maximum versatility. These tools transform simple polish application into professional looking nail art.
Dotting tools create perfect circles for polka dot designs and accent details across various patterns. We recommend having multiple sizes available, though bobby pins and toothpicks serve as excellent alternatives for beginners. These tools work particularly well for creating holly dots in Christmas designs and bubble effects in ocean wave patterns.
Top coat sealer locks in your design while adding professional shine and extended wear time. Apply thin, even coats to prevent smudging and protect intricate details like gradient ombre effects and glitter applications. Quality top coats can extend your toe nail art from days to weeks of perfect wear.
Step-by-Step Application Tips

Perfect application starts with preparation and ends with protection. We’ll guide you through each essential step to ensure your beginner toe nail designs look professional and last longer.
Proper Nail Preparation Techniques
Clean your nails thoroughly to remove any oils and lotions that could prevent polish adhesion. We recommend using rubbing alcohol or nail dehydrator on a cotton pad to eliminate all residue from your toenails.
Trim and shape your toenails before applying any polish to create the ideal canvas for your design. File in one direction rather than back and forth to prevent splitting and achieve smooth edges.
Push back your cuticles gently if necessary using a cuticle pusher or orange stick. We suggest soaking your feet in warm water for 5 minutes first to soften the cuticle area and make this step easier.
Apply a clear base coat as your foundation layer to protect your natural nails and help the polish adhere better. This essential step prevents staining and creates a smooth surface for your design work.
Wait 2-3 minutes between each preparation step to ensure everything is completely dry before moving forward. Rushing through preparation often leads to smudged or uneven results.
Finishing with Top Coat Protection
Apply a clear top coat immediately after completing your design to seal the polish and prevent chipping. We recommend using steady, even strokes that cover the entire nail surface including the free edge.
Choose a quick dry top coat when available to reduce drying time and minimize the risk of smudging your finished design. These formulas typically dry within 60 seconds compared to regular top coats that take 10-15 minutes.
Cap the free edge by running the brush along the tip of each toenail during top coat application. This technique helps prevent chips and extends the life of your toe nail design significantly.
Allow 30 minutes of complete drying time before putting on socks or shoes to ensure your design sets properly. We suggest doing your toenails when you have time to relax and let them cure undisturbed.
Reapply top coat every 3-4 days to maintain shine and protection as your design wears. This simple maintenance step keeps your beginner toe nail designs looking fresh and professional longer.
Conclusion
We’ve shown you that creating stunning toenail designs doesn’t require professional training or expensive salon visits. With just a few basic tools and these simple techniques you can transform your toenails into beautiful works of art that reflect your personal style.
Remember that practice makes perfect and every nail artist started as a beginner. Don’t be afraid to experiment with different colors patterns and seasonal themes. The key is to start simple and gradually build your skills as you become more comfortable with the tools and techniques.
Your toenails are a canvas for creativity and self-expression. Whether you’re preparing for sandal season or just want to add some fun to your daily routine these beginner-friendly designs will help you achieve salon-quality results from the comfort of your own home.
Frequently Asked Questions
What tools do I need to create salon-quality toenail designs at home?
You’ll need basic nail polishes in versatile shades (soft pink, cherry red, white, clear), precision brushes, dotting tools, base coat, top coat, and tape for geometric designs. Optional tools include bobby pins or toothpicks as alternatives to dotting tools. These affordable supplies help achieve professional-looking results without expensive salon visits.
How do I create perfect polka dots on my toenails?
Use a dotting tool dipped in nail polish to create uniform circles, or try bobby pins and toothpicks for varying sizes. Apply dots while the base color is slightly tacky for better adhesion. Space dots evenly and work quickly before the polish thickens. Let each layer dry completely before adding more dots.
What’s the easiest beginner-friendly toenail design to start with?
French tips are the most beginner-friendly design. Apply a nude or pink base coat, then use a precision brush or tape to create clean white tips. You can modernize this classic look with colorful tips instead of white, or add small decorative elements like dots or thin stripes.
How can I make my toenail designs last longer?
Start with clean, trimmed nails and apply a clear base coat. Wait between each step to prevent smudging. Seal your design with a quality top coat, capping the free edge. Reapply top coat every few days to maintain shine and prevent chipping. Use quick-dry formulas to speed up the process.
Can I create gradient ombre effects on short toenails?
Yes! Use a makeup sponge to blend two complementary colors from cuticle to tip. Apply the lighter shade as a base, then dab the darker color on the sponge and gently press onto the nail tip. Blend while wet and seal with top coat for a smooth, professional gradient effect.
What are some easy seasonal designs for beginners?
For Christmas, try red and green stripes using tape, or create simple holly dots with green polish and a dotting tool. Summer designs include ocean waves with blue shades, tropical sunset ombres, or simple seashell accents. Start with two-color combinations before attempting more complex seasonal themes.
How do I add glitter accents without making it look messy?
Apply glitter polish to accent nails (like big toes) over a complementary base color. For subtle effects, add glitter only to nail tips. Use a small brush for precise application and clean up edges with a cleanup brush dipped in acetone. Always seal glitter with top coat to prevent flaking.
What colors work best for minimalist toenail designs?
Nude and neutral shades like beige, soft pink, and taupe are perfect for everyday wear. Bold summer colors like coral, turquoise, and sunny yellow make great statement shades. For color blocking, choose colors within the same family or use complementary shades for a harmonious, sophisticated look.