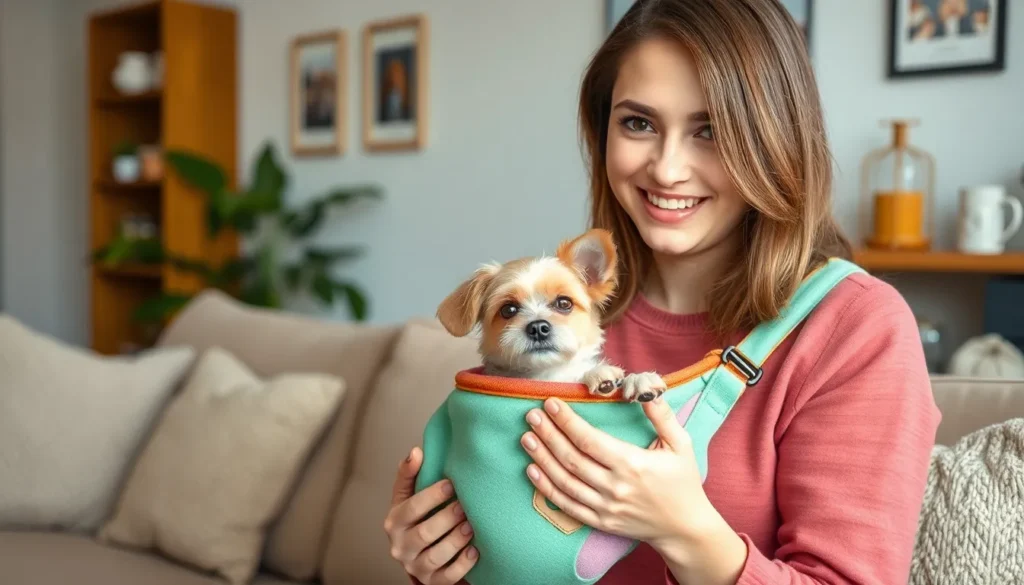
Trimming your dog’s nails can feel like wrestling a furry tornado – we’ve all been there! Whether your pup turns into a wiggling escape artist or simply gets anxious during grooming time, keeping them still for nail care becomes a real challenge.
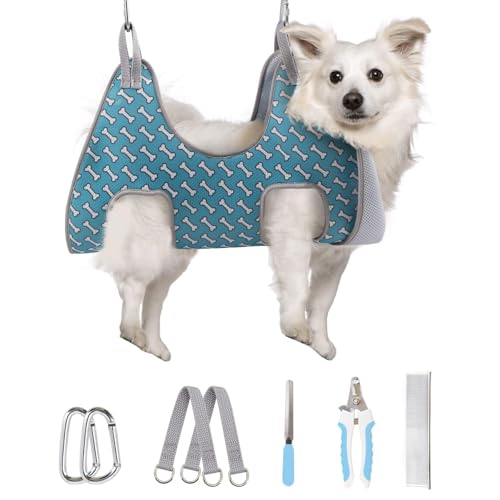
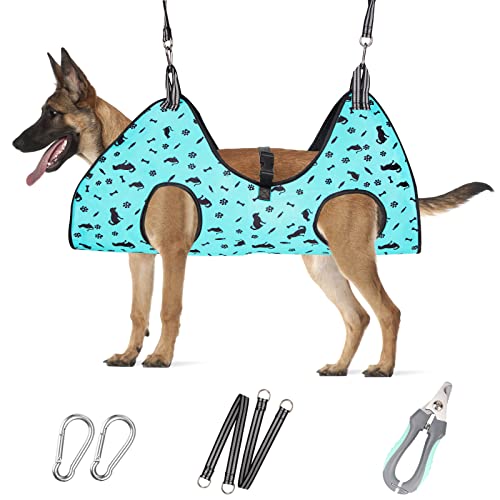
That’s where a DIY dog sling comes to the rescue. This simple yet brilliant solution helps secure your dog comfortably while giving you easy access to all four paws. We’re talking about a game-changing tool that transforms nail trimming from a stressful ordeal into a manageable routine.
The best part? You can create an effective dog sling using common household materials for just a few dollars. We’ll show you exactly how to build this lifesaving grooming aid that’ll make both you and your furry friend much happier during nail trimming sessions.
Why You Need a DIY Dog Sling for Nail Trimming
Restraining anxious dogs safely becomes essential when traditional grooming methods fail. We’ve found that most dogs experience important stress during nail trimming sessions, leading to squirming, biting, or complete refusal to cooperate. Dog slings provide gentle support that keeps your pet secure without causing discomfort or panic.
Professional grooming costs add up quickly for routine nail maintenance. Mobile groomers typically charge $15 to $30 per nail trimming session, while veterinary clinics range from $20 to $45 for the same service. Creating your own restraint system eliminates these recurring expenses and gives you complete control over the grooming schedule.
Safety concerns multiply when dogs struggle during nail cutting procedures. Quick cuts become more likely when pets move unexpectedly, potentially causing pain and bleeding that creates lasting fear of grooming. Slings minimize sudden movements by providing consistent support that keeps your dog’s paws accessible while maintaining their comfort level.
Emergency nail trims require immediate answers when professional services aren’t available. Overgrown nails can split, crack, or grow into paw pads, creating painful conditions that need prompt attention. Having a DIY restraint system ready ensures you can address urgent nail care situations without delay or additional stress.
Bonding opportunities increase when you handle your dog’s grooming needs personally. Regular nail maintenance performed at home helps build trust between you and your pet through gentle, consistent handling. Dogs learn to associate your touch with care rather than fear, making future grooming sessions progressively easier for both of you.
Customization options allow you to adapt the sling to your exact dog’s needs. Commercial restraints often use standard sizing that doesn’t accommodate unique body shapes, weight distributions, or behavioral quirks. Building your own system lets you adjust dimensions, padding placement, and support points to match your pet’s individual requirements perfectly.


Essential Materials for Making Your Dog Nail Trimming Sling

Creating an effective DIY dog sling requires selecting the right materials to ensure both safety and comfort. We’ve compiled the essential components you’ll need to build a reliable restraint system that makes nail trimming stress free for both you and your pet.
Fabric Options and Requirements
Canvas fabric stands out as our top recommendation due to its exceptional durability and weight bearing capacity. This heavy duty material can support dogs weighing up to 100 pounds without stretching or tearing during use. Nylon presents another excellent choice, offering lightweight portability while maintaining the strength needed for secure restraint.
Size requirements depend entirely on your dog’s measurements, but we recommend choosing fabric that’s at least 36 inches wide for medium sized dogs like Golden Retrievers or Border Collies. Large breeds such as German Shepherds or Great Danes need fabric measuring 48 inches wide or more to accommodate their body length comfortably.
Breathability becomes crucial for longer grooming sessions, making cotton canvas blends ideal for dogs prone to overheating. Waterproof materials like vinyl coated fabrics work well for dogs who drool excessively or if you’re concerned about accidents during the trimming process.
Hardware and Fastening Components
Carabiners rated for climbing or industrial use provide the safest attachment points, with a minimum weight capacity of 500 pounds recommended for all dog sizes. Avoid keychain style carabiners completely, as these decorative versions aren’t designed to handle the ever-changing forces created by an anxious dog.
Adjustable nylon straps with quick release buckles offer the versatility needed to customize fit across different dog breeds and sizes. These components should feature reinforced stitching at stress points and metal hardware rather than plastic alternatives that may crack under pressure.
D rings sewn into the fabric create secure anchor points for attaching support straps without compromising the sling’s structural integrity. Velcro strips can supplement buckles for quick adjustments, though they shouldn’t serve as primary fastening mechanisms due to potential failure under stress.
Tools You’ll Need for Construction
Heavy duty fabric scissors designed for canvas or upholstery materials ensure clean, precise cuts that won’t fray over time. Regular household scissors often struggle with thick fabrics and can create uneven edges that weaken the finished product.
Sewing machines capable of handling thick materials prove invaluable for creating professional quality seams, though hand sewing remains a viable option for those without access to heavy duty equipment. Industrial needles and upholstery thread provide the strength necessary for seams that must withstand pulling forces.
Fabric markers allow you to mark leg openings and strap placement accurately before cutting, preventing costly mistakes that could compromise your dog’s comfort or safety. Measuring tape ensures proper sizing throughout the construction process, while safety pins help position components during assembly.


Step-by-Step Instructions for Creating Your Dog Sling

Now that we’ve gathered our materials, we’re ready to transform them into a functional nail trimming sling. Follow these detailed steps to create a secure and comfortable restraint system for your furry friend.
Measuring Your Dog for Proper Fit
Length measurements form the foundation of our sling design. We’ll start by measuring from the base of your dog’s neck to the base of their tail using a flexible measuring tape. This measurement determines the main body length of our sling.
Width calculations ensure comfortable chest support during nail trimming sessions. We measure across your dog’s chest at its widest point, then add 4-6 inches for breathing room and fabric overlap. Dogs with barrel-shaped chests need extra width allowance compared to narrow-chested breeds.
Leg opening positions require careful marking on our measurements. We note where each leg naturally falls when your dog stands in a relaxed position. Mark these points on your measurement notes, as they’ll guide our fabric cutting process.
Cutting and Preparing the Fabric
Fabric selection impacts the durability and comfort of our finished sling. We choose sturdy canvas or denim as recommended in our materials list, ensuring the fabric can support your dog’s weight without stretching or tearing.
Pattern creation starts with drawing our sling shape on paper first. We create a rectangular base using our length and width measurements, then mark four oval-shaped leg holes approximately 3-4 inches in diameter. The head opening should measure roughly 6-8 inches across for most medium to large dogs.
Cutting precision ensures clean edges and proper fit. We cut two identical pieces of fabric using sharp fabric scissors, leaving an additional inch around all edges for seam allowances. Pin the pattern to the fabric before cutting to prevent shifting and ensure accuracy.
Sewing the Main Body of the Sling
Edge preparation creates clean, professional-looking seams. We fold and press all raw edges using an iron, creating neat ¼-inch hems around the leg openings and head hole. This prevents fraying and adds structural integrity to high-stress areas.
Main seam construction joins our two fabric pieces together securely. We place the fabric pieces with right sides together and sew around the perimeter using a heavy-duty thread, leaving the marked openings for legs and head. Use a ¼-inch seam allowance and backstitch at stress points for added strength.
Opening finishing ensures comfortable contact points for your dog. We carefully clip excess fabric at curves and turn the sling right-side out. Then we topstitch around each opening with a zigzag stitch to prevent tearing during use.
Adding Straps and Attachment Points
Strap positioning determines how easily we can lift and secure our dog. We attach four adjustable nylon straps to the corners of our sling, ensuring they’re positioned to distribute weight evenly across the fabric. Each strap should measure approximately 18-24 inches in length.
Hardware installation creates secure connection points for lifting. We sew climbing-rated carabiners or heavy-duty D-rings to the end of each strap using box stitching techniques. This reinforced stitching pattern prevents hardware from pulling away under your dog’s weight.
Adjustment mechanisms allow us to customize the fit for different dogs. We thread adjustable buckles onto each strap before attaching the hardware, enabling quick size modifications. Test each buckle’s holding strength by pulling firmly before using the sling on your pet.
Safety Considerations When Using a DIY Dog Sling

Creating your own dog sling requires careful attention to safety protocols that protect both you and your pet during nail trimming sessions. We must prioritize proper techniques and warning signs to ensure a positive grooming experience.
Proper Weight Distribution Techniques
Distribute your dog’s weight evenly across the sling to prevent strain on any single body part during nail trimming. We recommend positioning the sling so it supports the chest and hindquarters simultaneously, avoiding pressure points that could cause discomfort.
Adjust the sling tightness to allow comfortable breathing and natural movement while maintaining security. Your dog should be snug but not constricted, with enough room to shift slightly without escaping the restraint.
Support larger dogs with wider fabric panels that spread their weight across a greater surface area. We suggest using reinforced stitching at stress points where your dog’s weight concentrates most heavily.
Check the suspension points regularly to ensure they’re distributing weight properly and not creating uneven pressure. Position attachment points to maintain your dog’s natural posture rather than forcing an uncomfortable position.
Signs Your Dog Is Uncomfortable
Watch for vocalizations like whining or growling, which indicate your dog feels trapped or stressed in the sling. We need to immediately assess and adjust the restraint if these sounds occur during nail trimming.
Monitor body language including tail tucking, avoiding eye contact, or attempts to escape the sling. These behaviors signal that your dog feels helpless and may escalate to panic if not addressed quickly.
Notice physical signs such as excessive panting or visible distress that suggest the sling is causing anxiety or discomfort. We should pause the nail trimming session and evaluate whether the restraint needs modification.
Observe breathing patterns to ensure the sling isn’t restricting your dog’s chest movement or airway. Rapid or labored breathing indicates the need for immediate adjustment or removal of the restraint.
Emergency Release Mechanisms
Install quick release clips that allow instant removal of the sling if your dog becomes severely distressed during nail trimming. We recommend using spring loaded carabiners or similar hardware that opens with a single motion.
Position release mechanisms within easy reach so you can free your dog immediately without fumbling with complicated fasteners. Practice operating these releases before using the sling for actual grooming sessions.
Create adjustable straps that can be loosened quickly if your dog shows signs of distress or breathing difficulty. We suggest using buckles or Velcro closures that provide rapid adjustment options.
Test emergency procedures regularly to ensure all release mechanisms function properly under stress. Your ability to quickly free an anxious dog can prevent injury and maintain trust during future grooming sessions.


Training Your Dog to Accept the Nail Trimming Sling

Once we’ve constructed our DIY sling, we’ll need to help our dog feel comfortable using it. Proper training transforms what could be a stressful experience into a manageable grooming routine.
Introduction and Desensitization Process
Starting the desensitization process slowly helps our dog develop positive associations with the sling. We should place the sling near our dog’s favorite resting area for several days before attempting to use it. Allowing our pet to sniff and investigate the fabric naturally reduces anxiety about this new grooming tool.
Introducing the sling gradually prevents overwhelming our dog with unfamiliar sensations. We can begin by gently draping the fabric over our dog’s back during regular petting sessions. Keeping initial exposures brief helps maintain our dog’s comfort level while building familiarity with the material.
Placing the sling on our dog without lifting creates the first hands-on experience. We should let our pet wear the sling for just a few minutes while they remain on solid ground. This step allows our dog to adjust to the feeling of fabric around their body before adding the element of being suspended.
Positive Reinforcement Strategies
Rewarding calm behavior with treats and praise builds positive connections to sling training. We should offer high-value treats like small pieces of chicken or cheese when our dog remains relaxed during sling introduction. Verbal encouragement using an upbeat tone reinforces that wearing the sling leads to good things.
Timing our rewards correctly maximizes their effectiveness during training sessions. We need to give treats immediately when our dog shows acceptance of the sling rather than waiting until after removal. This immediate reinforcement helps our pet understand exactly which behaviors we want to encourage.
Using a muzzle when necessary helps our dog focus away from foot handling concerns. We should introduce the muzzle separately from sling training to avoid creating negative associations between the two tools. Combining muzzle training with treats ensures our dog views this safety equipment positively.
Creating a predictable routine around sling sessions reduces our dog’s stress levels. We can establish exact times for training that coincide with our pet’s calmest moments of the day. Following the same sequence of actions helps our dog anticipate what comes next during grooming preparation.
Gradual Exposure Techniques
Beginning with short sessions prevents overwhelming our dog during the learning process. We should start with just 30-second intervals in the sling before gradually extending the time. These brief exposures allow our pet to build confidence without becoming anxious about prolonged restraint.
Practicing nail trimming techniques while our dog remains in the sling develops familiarity with the full grooming process. We can start by simply touching our dog’s paws while they’re suspended to gauge their comfort level. Moving slowly through each step of nail examination helps our pet understand the routine.
Increasing session duration gradually builds our dog’s tolerance for extended grooming periods. We might extend sling time by 15-30 seconds each week as our pet shows comfort with the current duration. This progressive approach ensures our dog never feels rushed or stressed during the adaptation process.
Working with one paw at a time reduces the intensity of nail trimming sessions. We should complete all nail work on a single paw before moving to the next during early training stages. This methodical approach helps our dog adjust to foot handling while suspended in the sling.

Troubleshooting Common DIY Dog Sling Issues

Even the best-constructed dog slings can present challenges during use. Let’s explore practical answers to the most common problems you’ll encounter.
Adjusting for Different Dog Sizes
Large breed dogs require fabric pieces that extend at least 6 inches beyond their body length on each side. We recommend using a 48-inch by 36-inch piece of canvas for dogs weighing over 60 pounds like German Shepherds or Golden Retrievers.
Small breed adjustments work best with compact fabric dimensions around 24 inches by 18 inches for dogs under 25 pounds such as Beagles or Cocker Spaniels. Cut leg holes approximately 4 inches in diameter for small dogs and 6-8 inches for larger breeds.
Medium sized dogs typically need fabric measuring 36 inches by 24 inches with leg openings around 5-6 inches wide. Test each hole size by gently placing your dog’s paw through before final cutting.
Multi dog households benefit from creating size exact slings rather than one adjustable version. Mark each sling clearly with your dog’s name to avoid confusion during grooming sessions.
Fixing Stability Problems
Hanging attachment issues often stem from inadequate anchor points above your grooming area. Install heavy duty ceiling hooks rated for at least 150 pounds to support even large dogs safely.
Carabiner placement should connect to reinforced fabric loops rather than directly through cut holes. Sew additional fabric patches at attachment points to distribute weight evenly across the sling.
Swaying problems decrease when you position your dog closer to the attachment point. Keep the sling height low enough that your dog’s paws barely touch the ground for maximum stability.
Support beam installation works well in garages or basements where exposed ceiling joists provide natural anchor points. Always verify structural integrity before hanging any dog sling system.
Addressing Fabric Wear and Tear
High stress areas around leg openings show wear first due to constant movement and weight distribution. Reinforce these zones with double layer stitching or iron on fabric patches before initial use.
Canvas durability typically lasts 12-18 months with regular weekly use according to most DIY dog owners. Replace slings when you notice fraying edges or stretched fabric that no longer provides firm support.
Preventive maintenance includes checking all seams monthly and re stitching loose areas immediately. Store your sling in a dry location to prevent mildew and fabric deterioration.
Fabric selection matters significantly for longevity with ripstop nylon lasting twice as long as standard cotton canvas. Choose materials with tight weaves that resist tearing under your dog’s weight and movement.
Alternative DIY Dog Restraint Methods for Nail Trimming

While DIY slings work exceptionally well for many dogs, we’ve found that some pets respond better to different restraint approaches. These methods can serve as effective alternatives or complementary techniques when your homemade sling isn’t the perfect fit.
Towel Wrapping Techniques
Towel wrapping creates a secure cocoon that naturally calms anxious dogs during nail trimming sessions. We recommend using a large bath towel or beach towel that completely envelops your dog’s body while leaving their paws accessible. Start by placing your dog in the center of the towel, then gently wrap the sides around their torso, ensuring their legs remain free for easy paw access.
Wrapping provides an immediate sense of security that mimics the comfort of being held. The gentle pressure from the towel activates your dog’s natural calming response, similar to how swaddling works for human babies. We’ve observed that dogs often stop struggling within 30-60 seconds of proper towel wrapping, making nail trimming significantly easier.
Benefits include reduced movement, decreased anxiety levels, and improved cooperation during grooming. This method works particularly well for small to medium sized dogs weighing under 40 pounds. The towel technique requires no special materials and can be implemented immediately whenever nail trimming becomes necessary.
Homemade Restraint Tables
Restraint tables offer elevated surfaces that provide better access to your dog’s paws while maintaining control. We suggest constructing a simple table using a wooden board measuring 24×36 inches for medium dogs, topped with a non-slip yoga mat for traction. Add adjustable side supports using PVC pipes or wooden rails to prevent your dog from stepping off the surface.
Construction involves creating a stable platform at an appropriate working height for comfortable nail trimming. The ideal table height ranges from 28-32 inches, allowing you to work without bending or straining your back. We recommend adding attachment points for leashes or harnesses to keep your dog centered on the table surface.
Features should include rounded edges, secure footing, and easy cleaning capabilities for repeated use. A properly built restraint table accommodates dogs weighing up to 60 pounds and provides consistent positioning for efficient nail trimming. This method works especially well for dogs that feel more secure on elevated surfaces rather than being held.
Partner Assisted Holding Methods
Partner assistance transforms nail trimming from a solo struggle into a coordinated team effort. We find that the two person technique works best when one person focuses entirely on holding and calming the dog while the other handles the nail clippers. The holder should position themselves behind or beside the dog, providing gentle but firm restraint around the chest and shoulders.
Two person coordination allows for better control and reduced stress for both the dog and the primary handler. The assistant can offer treats, speak soothingly, and monitor the dog’s comfort level while you concentrate on precise nail trimming. We recommend practicing this technique before attempting actual nail trimming to establish clear roles and communication.
Benefits include additional emotional support for anxious dogs and improved safety during the trimming process. This method proves particularly effective for large dogs weighing over 50 pounds or dogs with severe nail trimming anxiety. Partner assistance also allows for immediate response if your dog becomes distressed, ensuring a safer experience for everyone involved.
Maintenance and Care for Your Homemade Dog Sling

Proper care of your DIY dog sling ensures it remains safe and effective for countless nail trimming sessions. Regular maintenance extends the life of your homemade restraint system while keeping your pet comfortable and secure.
Cleaning and Sanitizing Guidelines
Wash removable fabric components after each use with pet-safe detergent and hot water if the material allows. Canvas and nylon materials typically handle machine washing well, but always check fabric care labels first.
Wipe non-removable components with a damp cloth and mild soap solution when they can’t be fully submerged. Focus on areas that directly contact your dog’s body, paying special attention to leg openings and support panels.
Apply pet-safe disinfectant sprays to surfaces that touch your dog’s skin and fur. We recommend using veterinary-approved sanitizing products rather than household cleaners that might irritate sensitive skin.
Rinse thoroughly after applying any cleaning solution to prevent chemical residue from causing skin reactions. Even pet-safe products should be completely removed before the next use.
Allow complete air drying before storing your sling to prevent bacterial and mold growth. Moisture trapped in fabric creates ideal conditions for harmful microorganisms that could affect your dog’s health.
Storage Best Practices
Choose a dry, well-ventilated storage location away from direct sunlight and moisture sources like laundry rooms or basements. Excessive heat and humidity can weaken fabric fibers and compromise your sling’s structural integrity.
Ensure complete dryness before folding or rolling your sling for storage. Wet or damp materials develop unpleasant odors and may deteriorate faster than properly dried equipment.
Keep climbing-rated carabiners and adjustable straps attached but properly fastened to prevent tangling during storage. This practice also helps you quickly identify any damaged hardware before your next grooming session.
Store in a designated container or hanging system that protects the sling from dust, pet hair, and other debris. A breathable fabric bag or dedicated shelf works better than plastic storage that traps moisture.
When to Replace Your DIY Sling
Replace immediately upon discovering tears, fraying, or stretched seams that compromise your dog’s safety during nail trimming. Visual inspection should reveal any structural weaknesses that could lead to sudden failure.
Upgrade when fastenings become unreliable or show signs of wear like bent carabiners or stretched adjustment straps. Hardware failure poses serious risks when your dog is suspended in the restraint system.
Consider replacement if persistent odors or stains don’t resolve with thorough cleaning and sanitizing. These issues often indicate material breakdown that affects both hygiene and structural integrity.
Monitor weight capacity changes as your dog grows or if you plan to use the sling for multiple pets. A sling designed for a 30-pound dog won’t safely support a 60-pound animal without important modifications.
Inspect before each use to catch potential problems early and maintain optimal safety standards. Regular checks help identify wear patterns and maintenance needs before they become safety hazards.
Cost Comparison: DIY vs Store-Bought Dog Slings

DIY dog slings offer exceptional value when we examine the financial aspects of nail trimming answers. Making your own sling requires minimal materials that we likely already have at home, such as a large bag, scissors, and a marker. Total costs for a homemade sling typically remain under $10 when purchasing basic supplies from create stores or repurposing household items.
Store-bought dog slings present a significantly different investment range. Commercial options vary widely in price, starting around $20 for basic models and extending beyond $100 for premium designs. Professional-grade slings often include specialized features like reinforced stitching, veterinary-approved materials, and adjustable harness systems.
| Sling Type | Cost Range | Materials Quality | Durability | Customization |
|---|---|---|---|---|
| DIY | $5-$10 | Basic household items | 6-12 months | Fully customizable |
| Store-bought basic | $20-$40 | Standard fabric | 1-2 years | Limited adjustments |
| Store-bought premium | $50-$100+ | Professional materials | 3-5 years | Moderate adjustments |
Budget considerations extend beyond initial purchase costs when we factor in replacement needs. DIY slings require more frequent rebuilding as household materials wear down faster than commercial alternatives. But, we can easily modify homemade versions to accommodate our dog’s changing needs or size requirements without additional purchases.
Quality differences become apparent during extended use periods. Store-bought slings typically feature reinforced stress points, weather-resistant fabrics, and tested weight limits that ensure consistent performance. Our DIY versions rely on improvised materials that may not withstand repeated use or heavier dogs.
Time investment adds another dimension to our cost analysis. Creating a DIY sling requires approximately 2-3 hours of active construction time, plus testing and adjustment periods. Purchasing ready-made options eliminates this labor investment while providing immediate usability for urgent nail trimming situations.
Long-term value calculations favor different approaches depending on our exact circumstances. Frequent nail trimmers benefit from durable store-bought options that maintain their integrity through repeated use. Occasional users find DIY answers perfectly adequate for their limited grooming needs without the higher upfront investment.
Professional Tips for Successful Nail Trimming Sessions

Creating a calm environment sets the foundation for stress-free nail trimming with your DIY sling. We recommend dimming the lights slightly and playing soft music to help your dog relax. Removing distracting toys and treats from the area keeps your pet focused on the task at hand.
Gradual exposure to nail clippers reduces anxiety and builds positive associations with grooming tools. Start by showing your dog the clippers without using them, letting them sniff and investigate the tool for several days. We suggest placing treats near the clippers during these introductory sessions to create pleasant memories.
Positive reinforcement transforms nail trimming from a dreaded experience into a rewarding activity. Offer high-value treats like small pieces of chicken or cheese immediately after each successful nail trim. Verbal praise and gentle petting throughout the process reassure your dog that they’re behaving well.
Utilizing your DIY sling properly ensures maximum comfort and security during grooming sessions. Position the sling so your dog’s weight distributes evenly across their body, avoiding pressure on sensitive areas. We find that adjusting the leg holes snugly but not tightly prevents your pet from wiggling while maintaining circulation.
Timing your nail trimming sessions strategically improves cooperation and reduces stress levels. Schedule grooming after exercise when your dog feels naturally tired and relaxed. We avoid trimming nails when dogs are hungry, overly excited, or immediately after meals to prevent discomfort.
Starting with just one or two nails per session builds tolerance gradually over multiple grooming appointments. This approach prevents overwhelming anxious dogs while establishing a positive routine. We recommend increasing the number of trimmed nails only after your pet shows complete comfort with shorter sessions.
Recognizing your dog’s stress signals allows you to pause and redirect the session before anxiety escalates. Watch for excessive panting, trembling, or attempts to escape the sling as indicators that your pet needs a break. We immediately stop trimming and offer comfort when these signs appear, resuming only when our dog relaxes completely.
Conclusion
We’ve covered everything you need to transform nail trimming from a stressful ordeal into a manageable routine. With the right materials and careful construction our DIY sling provides a safe secure solution that costs a fraction of store-bought alternatives.
Remember that success depends on patience and proper training. Take time to introduce your dog to the sling gradually and always prioritize their comfort and safety during the process.
The investment in creating your own nail trimming sling pays dividends in reduced grooming costs stronger bonds with your pet and the confidence that comes from handling their care personally. Your dog will thank you for the gentle approach.
Frequently Asked Questions
What is a DIY dog sling and why do I need one for nail trimming?
A DIY dog sling is a homemade restraint tool that gently secures anxious or wiggly dogs during nail trimming. It provides comfortable support while preventing sudden movements that could cause injury. This tool makes grooming safer and less stressful for both you and your pet, especially for dogs who become anxious during nail care.
How much does it cost to make a DIY dog sling compared to buying one?
A DIY dog sling costs under $10 using household materials like canvas fabric, nylon straps, and carabiners. Store-bought slings range from $20 to over $100 depending on quality and features. The DIY option offers significant cost savings while allowing complete customization for your dog’s specific needs and size.
What materials do I need to create a dog nail trimming sling?
Essential materials include durable fabric (canvas or nylon), climbing-rated carabiners, adjustable nylon straps, heavy-duty thread, and basic sewing supplies. You’ll also need fabric scissors, a sewing machine, and measuring tape. Choose breathable, waterproof materials for comfort and easy cleaning after grooming sessions.
How do I measure my dog for a proper-fitting sling?
Measure your dog’s length from chest to hindquarters, width across the torso, and leg opening circumference. Add 2-3 inches to each measurement for comfort and adjustability. Small dogs need approximately 12×8 inch slings, medium dogs require 18×12 inches, and large dogs need 24×16 inch dimensions.
Is it safe to use a homemade dog sling for nail trimming?
Yes, when properly constructed and used correctly. Ensure proper weight distribution, monitor your dog for signs of distress, and include quick-release mechanisms for emergencies. Never leave your dog unattended in the sling, and adjust tightness to allow comfortable breathing while maintaining secure positioning.
How can I train my dog to accept the nail trimming sling?
Start with gradual desensitization by letting your dog sniff and investigate the sling. Use positive reinforcement with treats and praise during short exposure sessions. Begin with just placing the sling near your dog, then gradually work up to brief wearing periods before attempting nail trimming.
What are the signs that my dog is stressed while using the sling?
Watch for excessive panting, whimpering, struggling, drooling, or attempts to escape. Dilated pupils, rigid body posture, and vocalizations also indicate distress. If you notice these signs, immediately remove the sling and give your dog time to calm down before trying again with shorter sessions.
How do I maintain and clean my DIY dog sling?
Clean the sling after each use with pet-safe disinfectant or mild soap and water. Allow it to air dry completely before storage. Inspect regularly for wear, tear, or loose stitching. Store in a clean, dry place away from direct sunlight to prevent fabric deterioration.
What alternatives exist if a sling doesn’t work for my dog?
Try towel wrapping techniques that create a calming cocoon effect, homemade restraint tables for better access, or partner-assisted holding methods. Some dogs respond better to these alternative restraint methods. You can also consider professional grooming services for particularly anxious or aggressive dogs.
When should I replace my homemade dog sling?
Replace your sling when you notice frayed fabric, broken stitching, worn straps, or damaged hardware. Also replace it if your dog’s size changes significantly or if the sling no longer provides secure, comfortable restraint. Regular inspections help identify replacement needs before safety becomes compromised.