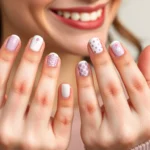
The holiday season calls for festive flair in every detail and our nails are no exception. Christmas nail art designs with French tips offer the perfect blend of classic elegance and seasonal sparkle that’ll make your manicure the star of every holiday gathering.
We’ve discovered that French tip nail art provides an incredibly versatile canvas for Christmas creativity. From traditional red and green color schemes to winter wonderland whites and golds, these designs transform the timeless French manicure into something truly magical for the holidays.
Whether you’re attending office parties, family dinners, or New Year’s celebrations, Christmas French tip nail art ensures your hands look polished and festive. We’ll show you stunning design ideas that range from subtle holiday accents to bold statement nails that capture the joy and wonder of the season. These designs prove that you don’t need to sacrifice sophistication for holiday spirit.
Classic Red and Green French Tip Christmas Designs
We’ve found that traditional holiday colors create the most timeless Christmas nail art designs. These classic combinations offer endless possibilities for festive French tip variations that work beautifully for any holiday celebration.
Traditional Holiday Color Combinations
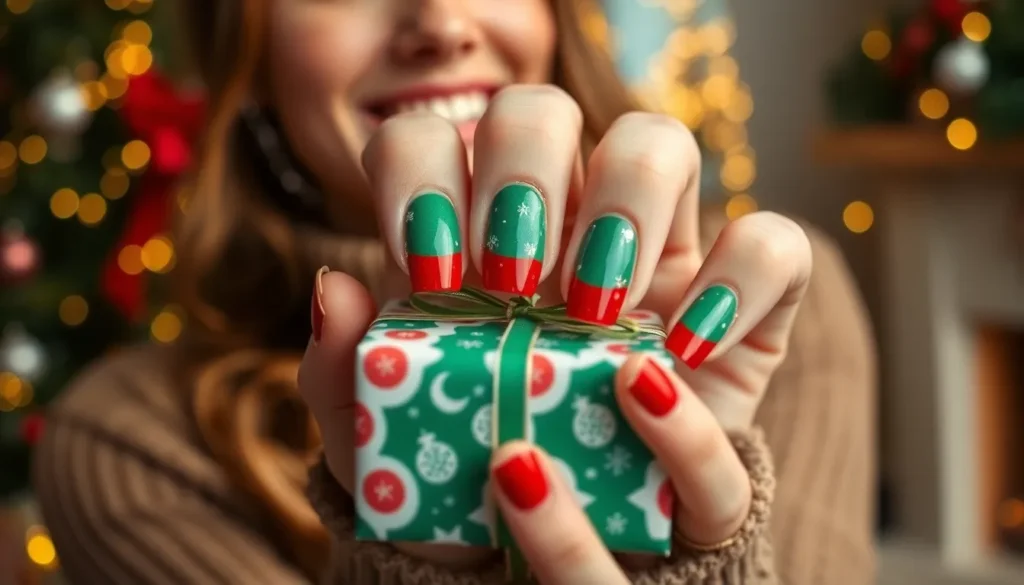
Deep emerald green tips paired with rich crimson accents create sophisticated holiday nails that complement both casual and formal attire. We recommend using forest green as your base French tip color while adding small red rhinestones along the smile line for extra sparkle.
Classic red French tips with gold glitter details bring warmth and elegance to your holiday look. Apply a deep red polish to create your French tip, then brush gold glitter along the edge for a luxurious finish that catches light beautifully.
Burgundy and sage green combinations offer a more muted approach to traditional holiday colors. These deeper tones work particularly well for office parties or sophisticated gatherings where you want festive nails without overwhelming brightness.
Candy Cane Striped French Tips
Alternating red and white stripes transform your French tips into miniature candy canes that capture the playful spirit of Christmas. We suggest using nail art brushes or striping tape to create clean, even lines across each tip.
Diagonal stripe patterns add visual interest while maintaining the candy cane theme. Start with a white base and paint thin red diagonal lines across your French tips, spacing them evenly for the most polished appearance.
Glitter stripe variations elevate the traditional candy cane design with sparkly red or silver stripes. Apply your base white French tip first, then use glitter polish to create the striped pattern for nails that truly shine during holiday festivities.
Holly and Berry Accent Details
Tiny holly leaves painted along the smile line bring natural Christmas elements to your French tip design. We create these delicate details using a fine nail art brush with dark green polish, adding small red dots for berries.
Three dimensional berry clusters using small red rhinestones or nail caviar beads create texture and visual appeal. Place these accent pieces strategically along your French tip edge, securing them with clear top coat for lasting wear.
Metallic holly outlines offer a more subtle approach to botanical Christmas nail art. Use gold or silver nail art pens to draw simple holly leaf shapes, then fill them with translucent green polish for an elegant botanical accent that enhances your festive French tips.
Glittery Gold and Silver French Tip Variations

Metallic French tips transform your nails into sophisticated accessories that complement holiday jewelry perfectly. These lustrous designs create stunning contrast against neutral base colors while maintaining the classic elegance of traditional French manicures.
Metallic Ombre French Tips
Gradient metallic effects create depth and dimension on your Christmas nails. Start with a clear or nude base and gradually blend gold or silver polish from the tip toward the cuticle, creating a seamless transition. Apply the metallic shade most heavily at the tips and feather it downward using a makeup sponge for smooth blending.
Silver ombre effects offer a modern, sophisticated alternative to traditional gold designs. Begin with three thin coats of silver polish at the tips and blend toward the base using circular motions. Layer different metallic shades like pewter and platinum for added complexity and visual interest.
Sparkly Snowflake Accents
Delicate snowflake patterns elevate gold and silver French tips with winter magic. Paint tiny six pointed snowflakes using white nail art polish over metallic tips for contrast. Add silver glitter to the center of each snowflake using a dotting tool for extra sparkle.
Negative space snowflakes create subtle elegance on metallic backgrounds. Use snowflake stencils or nail tape to mask areas before applying metallic polish, revealing the base color underneath. Finish with clear topcoat to seal the design and add protective shine.
Create dimensional snowflakes using rhinestones or nail gems placed strategically on gold French tips. Position larger stones at snowflake centers with smaller crystals radiating outward to mimic natural snow crystal formations.
Champagne and Rose Gold Options
Champagne tones provide subtle warmth that complements both cool and warm skin undertones. These softer metallic shades work beautifully for daytime holiday events and professional settings where bold colors might be inappropriate. Apply two thin coats over neutral bases for buildable coverage.
Rose gold French tips offer romantic elegance perfect for holiday date nights and intimate gatherings. Mix traditional gold polish with a drop of pink to create custom rose gold shades that match your jewelry perfectly. Layer sheer pink over gold tips for a similar effect with added depth.
Combine champagne and rose gold in alternating nail patterns for sophisticated variety. Paint champagne tips on your thumb, middle, and pinky fingers while using rose gold on your index and ring fingers for balanced visual appeal.
Winter Wonderland French Tip Nail Art

Embracing the magic of winter through nail art creates stunning designs that capture the season’s ethereal beauty. These designs incorporate elements like snowflakes, pinecones, or holly leaves to create truly festive looks that blend classic French tips with enchanting winter motifs.
Snowflake French Tip Patterns
Delicate snowflake designs transform traditional French tips into miniature winter masterpieces. We paint intricate snowflake patterns over classic white or nude bases using fine nail art brushes and white or light blue polish. Simple six-pointed stars work beautifully for beginners, while more experienced nail artists can create elaborate crystalline structures with multiple branches and detailed points.
Positioning these patterns strategically across the nail bed creates visual interest without overwhelming the design. We typically place one larger snowflake on the ring finger as an accent nail, then add smaller snowflake details to the remaining nails. Silver or holographic topcoat enhances the icy effect, making each snowflake catch the light like real winter crystals.
Icy Blue and White Combinations
This color scheme evokes the pristine beauty of winter landscapes through its frosty, crystalline appearance. We blend pale blue shades with crisp whites to create stunning gradient effects that mirror frozen winter mornings. Light blue tips paired with white nail beds offer a classic approach, while ombre techniques create seamless color transitions from white to various shades of icy blue.
Powder blue, sky blue, and periwinkle work exceptionally well for creating depth and dimension. We often incorporate subtle shimmer or pearl finishes to enhance the frosty appearance. These combinations suit both subtle everyday wear and dramatic holiday celebrations, depending on the intensity of the blue tones chosen.
Frosty Glitter Gradient Effects
Gradient glitter techniques add luxurious winter sparkle that transforms French tips into dazzling accessories. We apply frosty glitters in silver, blue, or white shades using sponge dabbing techniques to create seamless transitions from dense glitter coverage to subtle sparkle. Starting with heavy glitter concentration at the tips and gradually decreasing the density toward the cuticle creates stunning ombre effects.
Multiple glitter sizes enhance texture and visual appeal, combining fine shimmer with larger hexagonal pieces for maximum impact. We layer different glitter shades to create depth, often starting with silver base glitter and adding touches of blue or white for complexity. Sealing with glossy topcoat preserves the gradient effect while ensuring long-lasting wear throughout the holiday season.
Festive Character French Tip Designs

Character-themed French tips bring playful personality to your holiday manicure while maintaining elegant sophistication. These designs strategically place beloved holiday figures as accent details, creating a perfect balance between festive fun and refined style.
Santa Hat French Tips
Transform your French tips into miniature Santa hats by painting the tip section red at the top and white at the base to mimic Santa’s iconic headwear. Creating this look involves applying a red polish across the upper portion of your nail tip, then adding a white band underneath to represent the hat’s fluffy trim. Adding a tiny white pom-pom detail at the very tip using a dotting tool or small brush elevates the design’s charm and authenticity.
Pairing Santa hat tips with gold or green accent colors on remaining nails creates additional holiday spirit throughout your manicure. We recommend using the ring finger for the most detailed Santa hat design while keeping other nails simpler with coordinating festive French tips. Incorporating subtle glitter over the red portion adds dimension and catches light beautifully during holiday gatherings.
Reindeer Silhouette Accents
Feature delicate reindeer outlines as accent designs over basic French tips with red or green colored tips for sophisticated holiday nail art. These silhouettes work best when painted on one or two accent nails, typically the ring finger or thumb, while maintaining festive French tips on remaining nails. Creating reindeer profiles involves using a thin nail art brush to draw the distinctive antler shape and body outline in black or dark brown polish.
Improving reindeer designs with tiny red noses using a dotting tool adds whimsical charm without overwhelming the elegant French tip base. Some designs incorporate miniature Christmas lights painted as small colorful dots along the antlers for extra festive flair. Positioning the reindeer silhouette slightly above the French tip line creates visual balance and prevents the design from appearing cluttered.
Christmas Tree French Tip Art
Design Christmas tree motifs by using the French tip as the tree base or trunk, then painting a small green tree above the tip for charming holiday nail art. Full tree designs where the tip forms the trunk offer more dramatic visual impact and work especially well on longer nails. Building the tree shape involves layering different shades of green polish to create depth and dimension within the design.
Embellishing Christmas trees with glitter, rhinestones, or tiny star details transforms simple painted trees into sophisticated festive focal points. We suggest using gold or silver micro glitter sprinkled over wet green polish for a sparkling snow effect. Completing the look with a small yellow or white star at the tree’s peak using a fine detail brush adds the perfect finishing touch to your Christmas tree French tip art.
Elegant Minimalist Christmas French Tips

We’re embracing the beauty of understated holiday elegance with designs that whisper rather than shout. Minimalist Christmas French tips offer sophisticated festive touches perfect for those who prefer refined seasonal style.
Simple Line Art Designs
Tiny trees create stunning focal points when drawn in delicate strokes over classic French tips. We recommend positioning small Christmas trees or fir branches on accent nails using thin brushes for precise application.
Snowflakes add winter wonder through their intricate yet simple patterns. Delicate snowflake designs work beautifully when painted in white or silver over nude or clear bases, creating ethereal holiday charm.
Stars and bells bring festive sparkle without overwhelming the overall design. Simple star shapes or miniature bell outlines integrate seamlessly into French tip layouts, offering versatile options for different nail lengths and shapes.
Subtle Holiday Color Palettes
Muted reds and greens provide sophisticated alternatives to traditional bold Christmas colors. Softened versions of these classic shades blend harmoniously with neutral backgrounds, creating elegant holiday looks suitable for professional settings.
Gold accents elevate any minimalist design with their luxurious warmth. Adding touches of gold through thin lines, dots, or small decorative elements provides festive sophistication without overpowering the overall aesthetic.
Burgundy and sage combinations offer refined color pairings perfect for upscale holiday gatherings. These deeper, more complex tones create visual interest while maintaining the understated elegance that minimalist designs require.
Clean Geometric Christmas Patterns
Festive angular patterns transform traditional French tips into modern holiday statements. Triangles or chevrons in muted festive colors like dusty red, forest green, or antique gold create contemporary Christmas designs with geometric precision.
Minimal glitter accents enhance geometric patterns without creating visual chaos. Strategic placement of fine glitter along pattern edges or within exact geometric shapes adds holiday sparkle while preserving the clean, minimalist aesthetic.
Chevron variations offer ever-changing movement within the French tip framework. Alternating chevron patterns in subtle holiday hues create sophisticated depth and visual texture that catches light beautifully during holiday celebrations.
Bold Statement Christmas French Tip Ideas

Let’s jump into dramatic designs that command attention and transform your holiday look. We’ll explore techniques that elevate traditional French tips into show-stopping Christmas statements.
Chunky Glitter French Tips
Chunky glitter transforms your nails into dazzling holiday accessories that catch every light. We recommend covering the entire nail with chunky glitter polish for maximum drama, creating a festive look that sparkles from every angle. Applying chunky glitter only to the tips offers a more subtle approach while still delivering that essential Christmas sparkle.
Multi-colored chunky glitter creates depth and visual interest that mimics falling snow or scattered ornaments. We suggest layering different glitter sizes to achieve texture variation, starting with larger pieces and filling gaps with smaller sparkles. Top coat application becomes crucial with chunky glitter designs, ensuring smooth edges and long-lasting wear throughout your holiday celebrations.
Gold and silver chunky glitter combinations offer sophisticated drama that complements both casual and formal holiday outfits. We find that alternating between gold and silver tips creates an elegant contrast that catches light beautifully under holiday decorations.
Ornament-Inspired Nail Designs
Ornament shapes painted in metallic colors like silver and gold transform your nails into miniature Christmas tree decorations. We create these designs by painting small circular or teardrop shapes at the nail tips, mimicking the classic ornament silhouette. Adding tiny dots of contrasting colors gives these ornaments realistic detail and dimension.
Hanging ornament effects create three-dimensional visual interest that makes your nails appear to hold actual decorations. We achieve this look by painting thin lines from the cuticle area down to ornament shapes at the tips, creating the illusion of hanging ornaments. Metallic nail art pens work perfectly for drawing these delicate hanging lines with precision.
Textured ornament designs incorporate various finishes to mimic real Christmas decorations. We combine matte and glossy polishes within the same ornament shape to create contrast, or add small rhinestones as ornament caps for authentic sparkle. These dimensional elements make each nail unique while maintaining the overall ornament theme.
Mixed Media Christmas Elements
Combining different textures like glitter, chrome, and matte creates visually stunning designs that capture multiple aspects of the holiday season. We layer these textures strategically, using chrome as a base, matte accents for contrast, and glitter highlights for festive sparkle. This technique creates depth and sophistication that surpasses single-texture designs.
Incorporating themed elements like snowflakes, candy canes, and holly leaves alongside French tips creates comprehensive holiday storytelling on your nails. We paint these elements using nail art brushes, positioning them to complement the French tip shape rather than compete with it. Small details like tiny berries or snow dots add finishing touches that complete the festive narrative.
Layering techniques become essential when working with multiple media elements on French tip designs. We apply base colors first, add textural elements in the middle layer, and finish with protective top coat to seal all components together. This method ensures durability while maintaining the visual impact of each individual element throughout your holiday festivities.
DIY Christmas French Tip Tutorial Tips

Creating stunning Christmas French tips at home becomes achievable when you have the right tools and techniques. Let’s jump into everything you need to master these festive designs.
Essential Tools and Supplies
Base essentials form the foundation of any successful Christmas French tip manicure. We recommend investing in high-quality gel polish in festive colors like deep red, emerald green, crisp white, and metallic gold or silver shades. UV or LED lamps cure gel polish properly, ensuring your designs last throughout the holiday season.
Design tools elevate your nail art from basic to professional-looking. Nail stamps featuring snowflakes, holly leaves, and Christmas trees create intricate patterns effortlessly. Stickers work perfectly for beginners who want detailed designs without advanced painting skills. Fine-tip nail art brushes allow for precision work when adding delicate accents.
Application aids ensure smooth, even results every time. French tip guides or tape help create clean, consistent tip lines across all nails. Dotting tools create perfect circles for berries and ornament details. Tweezers position small embellishments like rhinestones and tiny pearls with precision.
Finishing supplies protect your artwork and enhance durability. Clear base coats prevent staining and create smooth application surfaces. Top coats seal designs and add glossy or matte finishes depending on your preference. Cuticle oil keeps surrounding skin healthy throughout the manicuring process.
Step-by-Step Application Techniques
Preparation sets the stage for professional results. Clean nails thoroughly with rubbing alcohol to remove oils and debris. Push back cuticles gently and file nails into your desired shape. Buff nail surfaces lightly to create better polish adhesion.
Base application creates the perfect canvas for your Christmas design. Apply thin base coat layers, curing each under your UV or LED lamp for the recommended time. Paint neutral colors like nude or clear pink on the main nail area, leaving space for your festive French tips.
French tip creation requires steady hands and patience. Use French tip guides or tape to mark clean lines where your festive colors begin. Apply red, green, or metallic polish to tip areas using thin, even strokes. Cure each color layer completely before proceeding to the next step.
Design addition brings your Christmas theme to life. Position nail stamps carefully over cured base colors, pressing firmly for clean transfers. Apply stickers while polish remains slightly tacky for better adhesion. Paint small details like holly berries or snowflake centers using fine-tip brushes.
Final sealing protects your artwork and enhances longevity. Apply thin top coat layers over completed designs, ensuring complete coverage of all elements. Cure final layers thoroughly under your lamp. Clean any residue with rubbing alcohol for a perfect glossy finish.
Common Mistakes to Avoid
Uneven tip placement creates unprofessional-looking results across your manicure. Measure tip widths carefully using guides or tape to ensure consistency between all nails. Mark placement points lightly with a dotting tool before applying colored polish to each tip.
Insufficient curing time leads to smudged designs and shortened wear time. Follow manufacturer recommendations for curing duration under your exact lamp type. Test polish cure by gently touching nail surfaces; properly cured polish feels completely dry and smooth.
Rushed application often results in streaky colors and imperfect lines. Allow adequate time between each step, especially when working with multiple colors. Practice your technique on practice nails or nail wheels before attempting complex designs on your natural nails.
Sticker misalignment creates bubbled, wrinkled, or crooked design elements. Position stickers carefully while polish remains slightly tacky but not wet. Smooth from center outward to eliminate air bubbles, using a cuticle pusher for precision placement.
Overloading with embellishments can overwhelm your design and compromise durability. Choose one or two accent nails for heavy decoration rather than adorning every nail. Balance bold elements with simpler designs to create cohesive, elegant Christmas nail art.
Conclusion
Christmas French tip nail art offers endless possibilities to express your holiday spirit while maintaining sophisticated elegance. Whether you prefer classic red and green combinations or modern minimalist designs these festive styles ensure you’ll have stunning nails throughout the season.
We’ve explored everything from glittery metallics to playful character themes giving you options for every holiday occasion. The beauty of Christmas French tips lies in their versatility – they’re perfect for both intimate family gatherings and glamorous New Year’s celebrations.
With our step-by-step tutorial and pro tips you now have everything needed to create salon-quality holiday nail art at home. These designs will keep your nails looking polished and festive making you feel confident and ready to celebrate the most wonderful time of year.
Frequently Asked Questions
What are Christmas French tip nail designs?
Christmas French tip nail designs combine the classic elegance of traditional French manicures with festive holiday elements. These designs feature seasonal colors like red, green, gold, and silver, along with holiday motifs such as snowflakes, holly leaves, candy canes, and Santa hats. They offer a sophisticated way to celebrate the season while maintaining the timeless appeal of French tips.
What colors work best for Christmas French tips?
Traditional Christmas colors include red and green combinations, with deep emerald tips and crimson accents being particularly popular. Metallic options like gold, silver, champagne, and rose gold add sophistication. Winter-inspired colors such as icy blue, white, and burgundy create elegant alternatives. These colors can be used alone or combined for more complex designs.
How do I create candy cane striped French tips?
Start with a white base coat, then use nail striping tape or a thin brush to create alternating red and white diagonal stripes across the tip. For cleaner lines, apply the white base first, let it dry completely, then add red stripes using tape as a guide. Finish with a top coat to seal the design and add optional glitter for extra sparkle.
What tools do I need for DIY Christmas French tips?
Essential tools include base coat, various colored polishes, nail art brushes, dotting tools, striping tape, nail stickers, and top coat. Optional supplies include glitter, rhinestones, nail gems, and nail art pens for detailed work. Good lighting and a steady hand are also important for achieving clean, professional-looking results at home.
How can I make my Christmas nail art last longer?
Start with clean, properly prepped nails and apply a quality base coat. Allow each layer to dry completely before applying the next. Use thin coats rather than thick ones to prevent chipping. Seal your design with a durable top coat and reapply every few days. Avoid using your nails as tools and wear gloves when cleaning to protect your manicure.
Are there minimalist Christmas French tip options?
Yes, minimalist designs focus on subtle holiday elements like simple line art, tiny snowflakes, or delicate trees. Use muted color palettes with soft reds, greens, and golds instead of bold colors. Clean geometric patterns in festive hues and minimal glitter accents create sophisticated looks that maintain holiday spirit without overwhelming the overall design.
How do I fix common mistakes in Christmas nail art?
For uneven French tips, use nail guides or tape for cleaner lines. If polish smudges, clean it immediately with a small brush dipped in nail polish remover. For sticker misalignment, gently lift and reposition while the base is still slightly tacky. Always allow adequate drying time between coats to prevent smearing and ensure long-lasting results.
Can I mix different Christmas nail art techniques?
Absolutely! Combining techniques creates unique, personalized designs. You can pair glitter gradients with snowflake accents, or mix metallic tips with holiday character motifs. Layering different textures like matte and glossy finishes, or combining geometric patterns with organic holiday elements, adds visual interest while maintaining overall cohesion in your nail art design.